
User's Manual
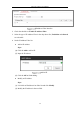
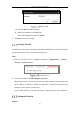
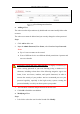
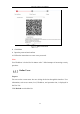
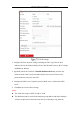
Table Of Contents
- Chapter 1 System Requirement
- Chapter 2 Network Connection
- Chapter 3 Access to the Network Camera
- Chapter 4 Wi-Fi Settings
- Chapter 5 Live View
- Chapter 6 Network Camera Configuration
- Chapter 7 Network Settings
- 7.1 Configuring Basic Settings
- 7.2 Configure Advanced Settings
- 7.2.1 Configuring SNMP Settings
- 7.2.2 Configuring FTP Settings
- 7.2.3 Configuring Email Settings
- 7.2.4 Platform Access
- 7.2.5 Wireless Dial
- 7.2.6 HTTPS Settings
- 7.2.7 Configuring QoS Settings
- 7.2.8 Configuring 802.1X Settings
- 7.2.9 Integration Protocol
- 7.2.10 Bandwidth Adaptation
- 7.2.11 Network Service
- 7.2.12 Smooth Streaming
- Chapter 8 Video/Audio Settings
- Chapter 9 Image Settings
- Chapter 10 Event Settings
- 10.1 Basic Events
- 10.2 Smart Events
- 10.2.1 Configuring Audio Exception Detection
- 10.2.2 Configuring Defocus Detection
- 10.2.3 Configuring Scene Change Detection
- 10.2.4 Configuring Face Detection
- 10.2.5 Configuring Intrusion Detection
- 10.2.6 Configuring Line Crossing Detection
- 10.2.7 Configuring Region Entrance Detection
- 10.2.8 Configuring Region Exiting Detection
- 10.2.9 Configuring Unattended Baggage Detection
- 10.2.10 Configuring Object Removal Detection
- 10.3 VCA Configuration
- Chapter 11 Storage Settings
- Chapter 12 Playback
- Chapter 13 Picture
- Chapter 14 Application
- Appendix

Network Camera User Manual
65
available.
Set Account Security:
You can set the security questions during camera activation. Or you can set the
function at user management interface.
Security question setting is not cleared when you restore the camera (not to default).
Steps:
1. Enter setting interface:
Configuration > System > User Management > User Management
2. Click Account Security Settings.
3. Select questions and input answers.
4. Enter the E-mail address to receive the verification code for password recovery.
5. Click OK to save the settings.
Reset Admin Password:
Before you start:
The PC used to reset password and the camera should belong to the same IP address
segment of the same LAN.
Steps:
1. Enter login interface via web browser.
2. Click Forget Password.
3. Select the verification mode to E-mail Verification.
4. Read the Privacy Policy and click OK.
5. Click Export QR Code and save the code to local.
6. Send the code to pw_recovery@hikvision.com as an attachment. Your email
account for password recovery will receive a verification code in 5 minutes.
Note:
The verification code is valid within 48 hours.
7. Input the verification code in the text field below.