
User's Manual
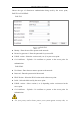
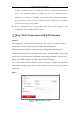
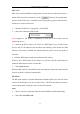
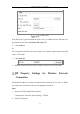

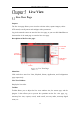
Table Of Contents
- Chapter 1 System Requirement
- Chapter 2 Network Connection
- Chapter 3 Access to the Network Camera
- Chapter 4 Wi-Fi Settings
- Chapter 5 Live View
- Chapter 6 Network Camera Configuration
- Chapter 7 Network Settings
- 7.1 Configuring Basic Settings
- 7.2 Configure Advanced Settings
- 7.2.1 Configuring SNMP Settings
- 7.2.2 Configuring FTP Settings
- 7.2.3 Configuring Email Settings
- 7.2.4 Platform Access
- 7.2.5 Wireless Dial
- 7.2.6 HTTPS Settings
- 7.2.7 Configuring QoS Settings
- 7.2.8 Configuring 802.1X Settings
- 7.2.9 Integration Protocol
- 7.2.10 Bandwidth Adaptation
- 7.2.11 Network Service
- 7.2.12 Smooth Streaming
- Chapter 8 Video/Audio Settings
- Chapter 9 Image Settings
- Chapter 10 Event Settings
- 10.1 Basic Events
- 10.2 Smart Events
- 10.2.1 Configuring Audio Exception Detection
- 10.2.2 Configuring Defocus Detection
- 10.2.3 Configuring Scene Change Detection
- 10.2.4 Configuring Face Detection
- 10.2.5 Configuring Intrusion Detection
- 10.2.6 Configuring Line Crossing Detection
- 10.2.7 Configuring Region Entrance Detection
- 10.2.8 Configuring Region Exiting Detection
- 10.2.9 Configuring Unattended Baggage Detection
- 10.2.10 Configuring Object Removal Detection
- 10.3 VCA Configuration
- Chapter 11 Storage Settings
- Chapter 12 Playback
- Chapter 13 Picture
- Chapter 14 Application
- Appendix

Network Camera User Manual
39
Live View Quick Setup
It allows quick setup of image/video related parameters on live view page.
Steps:
1. Click button on the right of the live view window to show the PTZ control
panel. Click to hide it.
2. Specify PTZ, Display, OSD and Video/Audio and VCA resource parameters. For
more settings, go to Configuration > Image and Configuration > Video/Audio.
Display Settings
Scene: Select a scene according to actual installation environment. (Only
certain camera models support.)
WDR: The WDR (Wide Dynamic Range) function helps the camera
provide clear images even under back light circumstances. When there
are both very bright and very dark areas simultaneously in the field of
view, WDR balances the brightness level of the whole image and provide
clear images with details. You can enable or disable the WDR function
and set the level.
HLC: High Light Compensation makes the camera identify and suppress
the strong light sources that usually flare across a scene. This makes it
possible to see the detail of the image that would normally be hidden.
OSD (On Screen Display)
Set text information displayed on screen. Alignment adjustment is available
for Text Overlay. Save the settings after configuration.
Video/Audio
Resolution and Max. Bit rate are adjustable. Click to change
stream.
VCA Resource
VCA Resource offers options to enable certain VCA functions and hide
others. It helps allocate more resources to the wanted functions. A reboot is
required after setting the VCA Resource.