
User's Manual
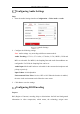

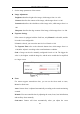
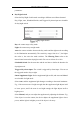
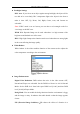
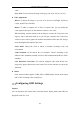
Table Of Contents
- Chapter 1 System Requirement
- Chapter 2 Network Connection
- Chapter 3 Access to the Network Camera
- Chapter 4 Wi-Fi Settings
- Chapter 5 Live View
- Chapter 6 Network Camera Configuration
- Chapter 7 Network Settings
- 7.1 Configuring Basic Settings
- 7.2 Configure Advanced Settings
- 7.2.1 Configuring SNMP Settings
- 7.2.2 Configuring FTP Settings
- 7.2.3 Configuring Email Settings
- 7.2.4 Platform Access
- 7.2.5 Wireless Dial
- 7.2.6 HTTPS Settings
- 7.2.7 Configuring QoS Settings
- 7.2.8 Configuring 802.1X Settings
- 7.2.9 Integration Protocol
- 7.2.10 Bandwidth Adaptation
- 7.2.11 Network Service
- 7.2.12 Smooth Streaming
- Chapter 8 Video/Audio Settings
- Chapter 9 Image Settings
- Chapter 10 Event Settings
- 10.1 Basic Events
- 10.2 Smart Events
- 10.2.1 Configuring Audio Exception Detection
- 10.2.2 Configuring Defocus Detection
- 10.2.3 Configuring Scene Change Detection
- 10.2.4 Configuring Face Detection
- 10.2.5 Configuring Intrusion Detection
- 10.2.6 Configuring Line Crossing Detection
- 10.2.7 Configuring Region Entrance Detection
- 10.2.8 Configuring Region Exiting Detection
- 10.2.9 Configuring Unattended Baggage Detection
- 10.2.10 Configuring Object Removal Detection
- 10.3 VCA Configuration
- Chapter 11 Storage Settings
- Chapter 12 Playback
- Chapter 13 Picture
- Chapter 14 Application
- Appendix

Network Camera User Manual
108
video.
Grey Scale: You can choose the range of the grey scale as [0-255] or [16-235].
Video Adjustment
Mirror: It mirrors the image so you can see it inversed. Left/Right, Up/Down,
Center, and OFF are selectable.
Rotate: To make a complete use of the 16:9 aspect ratio, you can enable the
rotate function when you use the camera in a narrow view scene.
When installing, turn the camera to the 90 degrees or rotate the 3-axis lens to 90
degrees, and set the rotate mode as on, you will get a normal view of the scene
with 9:16 aspect ratio to ignore the needless information such as the wall, and get
more meaningful information of the scene.
Scene Mode: Choose the scene as indoor or outdoor according to the real
environment.
Video Standard: 50 Hz and 60 Hz are selectable. Choose according to the
different video standards; normally 50 Hz for PAL standard and 60 Hz for NTSC
standard.
Lens Distortion Correction: For cameras equipped with motor-driven lens,
image may appear distorted to some extent. Turn on this function to correct the
distortion.
Others
Some camera models support CVBS, SDI, or HDMI output. Set the local output
ON or OFF according to the actual device.
Configuring OSD Settings
Purpose:
You can customize the camera name, time/date format, display mode, and OSD size
displayed on the live view.