
User Manual
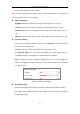
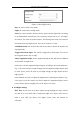
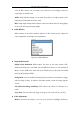
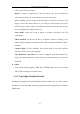

Table Of Contents
- Chapter 1 System Requirement
- Chapter 2 Network Connection
- Chapter 3 Access to the Network Camera
- Chapter 4 Wi-Fi Settings
- Chapter 5 Live View
- Chapter 6 Network Camera Configuration
- Chapter 7 Network Settings
- Chapter 8 Video/Audio Settings
- Chapter 9 Image Settings
- Chapter 10 Event Settings
- 10.1 Basic Events
- 10.2 Smart Events
- 10.2.1 Configuring Audio Exception Detection
- 10.2.2 Configuring Defocus Detection
- 10.2.3 Configuring Scene Change Detection
- 10.2.4 Configuring Face Detection
- 10.2.5 Configuring Intrusion Detection
- 10.2.6 Configuring Line Crossing Detection
- 10.2.7 Configuring Region Entrance Detection
- 10.2.8 Configuring Region Exiting Detection
- 10.2.9 Configuring Unattended Baggage Detection
- 10.2.10 Configuring Object Removal Detection
- 10.3 VCA Configuration
- Chapter 11 Storage Settings
- Chapter 12 Playback
- Chapter 13 Picture
- Chapter 14 Application
- Appendix

Network Camera User Manual
82
Figure 9-3 Day/Night Switch
Day: the camera stays at day mode.
Night: the camera stays at night mode.
Auto: the camera switches between the day mode and the night mode according
to the illumination automatically. The sensitivity ranges from 0 to 7, the higher
the value is, the easier the mode switches. The filtering time refers to the interval
time between the day/night switch. You can set it from 5s to 120s.
Scheduled-Switch: Set the start time and the end time to define the duration for
day/night mode.
Triggered by alarm input: The switch is triggered by alarm input. You can set
the triggered mode to day or night.
Smart Supplement Light: Set the supplement light as ON, and Auto and Manual
are selectable for light mode.
Select Auto, and the supplement light changes according to the actual luminance.
E.g., if the current scene is bright enough, then the supplement light adjusts itself
to lower power; and if the scene is not bright enough, the light adjusts itself to
higher power.
Select Manual, and you can adjust the supplement by adjusting the distance. E.g.,
if the object is near the camera, the device adjusts the supplement light to lower
power, and the light is in higher power if the object is far away.
Backlight Settings
BLC Area: If you focus on an object against strong backlight, the object will be
too dark to be seen clearly. BLC compensates light to the object in the front to
make it clear. OFF, Up, Down, Left, Right, Center, Auto, and Custom are
selectable.