
User Manual
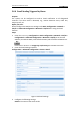
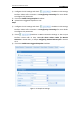
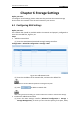
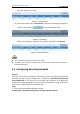
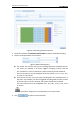
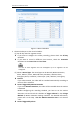
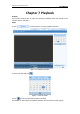
Table Of Contents
- Chapter 1 System Requirement
- Chapter 2 Network Connection
- Chapter 3 Access to the Network Camera
- Chapter 4 Live View
- Chapter 5 Network Camera Configuration
- Chapter 6 Storage Settings
- Chapter 7 Playback
- Chapter 8 Log Searching
- Chapter 9 Others
- Appendix

User Manual of Network Camera
52
Sender’s Address: The email address of the sender.
SMTP Server: The SMTP Server IP address or host name (e.g.,
smtp.263xmail.com).
SMTP Port: The SMTP port. The default TCP/IP port for SMTP is 25 (not secured).
And the SSL SMTP port is 465.
Enable SSL: Check the checkbox to enable SSL if it is required by the SMTP
server.
Attached Image: Check the checkbox of Attached Image if you want to send
emails with attached alarm images.
Interval: The interval refers to the time between two actions of sending attached
pictures.
Authentication (optional): If your email server requires authentication, check
this checkbox to use authentication to log in to this server and enter the login
user Name and password.
Choose Receiver: Select the receiver to which the email is sent. Up to 2 receivers
can be configured.
Receiver: The name of the user to be notified.
Receiver’s Address: The email address of user to be notified.
4. Click to save the settings.
5.6.7 Configuring Snapshot Settings
Purpose:
You can configure the scheduled snapshot and event-triggered snapshot. The
captured picture can be stored in the SD card (if supported) or the netHDD (For
detailed information about netHDD, please refer to Section 6.1 Configuring NAS
Settings). You can also upload the captured pictures to a FTP server.
Basic Settings
Steps:
1. Enter the Snapshot Settings interface:
Configuration > Advanced Configuration > Events > Snapshot
2. Check the Enable Timing Snapshot checkbox to enable continuous snapshot.
Check the Enable Event-triggered Snapshot checkbox to check event-triggered
snapshot.
3. Select the quality of the snapshot.
4. Set the time interval between two snapshots.
5. Click to save the settings.
Uploading to FTP
You can follow below configuration instructions to upload the snapshots to FTP.
Upload continuous snapshots to FTP
Steps: