
User's Manual
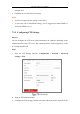
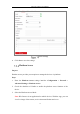
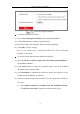
Table Of Contents
- Chapter 1 System Requirement
- Chapter 2 Network Connection
- Chapter 3 Access to the Network Camera
- Chapter 4 Wi-Fi Settings
- Chapter 5 Live View
- Chapter 6 Network Camera Configuration
- Chapter 7 Network Settings
- Chapter 8 Video/Audio Settings
- Chapter 9 Image Settings
- Chapter 10 Event Settings
- 10.1 Basic Events
- 10.2 Smart Events
- 10.2.1 Configuring Audio Exception Detection
- 10.2.2 Configuring Defocus Detection
- 10.2.3 Configuring Scene Change Detection
- 10.2.4 Configuring Face Detection
- 10.2.5 Configuring Intrusion Detection
- 10.2.6 Configuring Line Crossing Detection
- 10.2.7 Configuring Region Entrance Detection
- 10.2.8 Configuring Region Exiting Detection
- 10.2.9 Configuring Unattended Baggage Detection
- 10.2.10 Configuring Object Removal Detection
- 10.3 VCA Configuration
- Chapter 11 Storage Settings
- Chapter 12 Playback
- Chapter 13 Picture
- Chapter 14 Application
- Appendix

Network Camera User Manual
78
4) (Optional) You can click Send Test SMS to send a message to the mobile
phone for test.
5) Click Save to save the settings.
HTTPS Settings
Purpose:
HTTPS provides authentication of the web site and its associated web server, which
protects against Man-in-the-middle attacks.
Note:
HTTPS is enabled by default for certain camera models.
If HTTPS is enabled, the camera creates an unsigned certificate automatically.
When accessing via HTTPS, the web browser will send a prompt that installing a
signed certificate is recommended.
Steps:
1. Enter the HTTPS settings interface. Configuration > Network > Advanced
Settings > HTTPS.
2. Check Enable to access the camera via HTTP or HTTPS protocol.
3. Check Enable HTTPS Browsing to access the camera only via HTTPS protocol.
HTTPS Configuration Interface
4. Create the self-signed certificate or authorized certificate.