
User's Manual
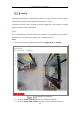
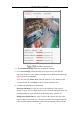
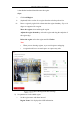
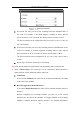
Table Of Contents
- Chapter 1 System Requirement
- Chapter 2 Network Connection
- Chapter 3 Access to the Network Camera
- Chapter 4 Wi-Fi Settings
- Chapter 5 Live View
- Chapter 6 Network Camera Configuration
- Chapter 7 Network Settings
- Chapter 8 Video/Audio Settings
- Chapter 9 Image Settings
- Chapter 10 Event Settings
- 10.1 Basic Events
- 10.2 Smart Events
- 10.2.1 Configuring Audio Exception Detection
- 10.2.2 Configuring Defocus Detection
- 10.2.3 Configuring Scene Change Detection
- 10.2.4 Configuring Face Detection
- 10.2.5 Configuring Intrusion Detection
- 10.2.6 Configuring Line Crossing Detection
- 10.2.7 Configuring Region Entrance Detection
- 10.2.8 Configuring Region Exiting Detection
- 10.2.9 Configuring Unattended Baggage Detection
- 10.2.10 Configuring Object Removal Detection
- 10.3 VCA Configuration
- Chapter 11 Storage Settings
- Chapter 12 Playback
- Chapter 13 Picture
- Chapter 14 Application
- Appendix

Network Camera User Manual
156
is that his/her head and shoulder enter the region.
Steps:
i. Click Add Region.
ii. (Optional) Select a color for a region from the color drop-down list.
iii. Draw a region by right click to determine the region boundary. Up to 10
edges are supported for a region.
Move the region: select and drag the region.
Adjust the region boundary: select the region and drag the endpoint of
the region edge.
Delete the region: select the region and click Delete.
Note:
• When you are drawing regions, try to avoid region overlapping.
• A region should cover as much space as a queue may take.
Region 1
Queue Management-Rule Settings
b) Set parameters for the added region.
i. Set the region name and alarm interval.
Region Name: It is displayed as OSD information.