Quick Start Guide
Manuals
Brands
Hikvision Manuals
Bullet Cameras
4 Megapixel Network IR Outdoor Bullet Camera, 4mm Lens
21
22
23
24
25
26
27
28
29
30
Table Of Contents
1 Appearance Description
1.1 Overview of Type I Bullet Camera
1.2 Overview of Type II Bullet Camera
1.2.1 Resetting the Camera
1.2.2 Setting the WPS Protocol
1.3 Overview of Type III Bullet Camera
2 Installation
2.1 Installation of Memory Card
2.2 Installation of Bullet Camera
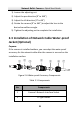
2.3 Installation of Network Cable Water-proof Jacket (Optional)
3 Setting the Network Camera over the LAN
3.1 Wiring
3.2 Activating the Camera
3.2.1 Activation via Web Browser
3.2.2 Activation via SADP Software
3.3 Modifying the IP Address
4 Accessing via Web Browser
5 Operating via Hik-Connect App
5.1 Enable Hik-Connect Service on Camera
5.1.1 Enable Hik-Connect Service via SADP Software
5.1.2 Enable Hik-Connect Service via Web Browser
5.2 Hik-Connect Setup
5.3 Adding Camera to Hik-Connect
5.4 Initializing the Memory Card
Network Bullet Camera
·
Quick S
tart Guide
22
22
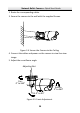
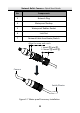
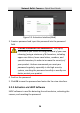
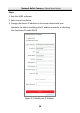
No.
Components
3
Network Plug
4
Wa
terproof Endcap
5
Wa
terproof Rubber Gas
k
et
6
Lock Nut
7
Network Cable from Router/Switch
Camera
Switch/Router
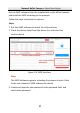
Align the snap and notch.
i. Insert
⑤
into
④
.
ii. Secure
⑥
with
④
.
Wa
ter-proof Accessory Installation
Figure 2-7
1
...
...
21
22
23
24
25
...
...
40