
User Manual
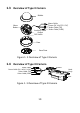
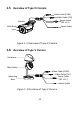


Table Of Contents

18
6. Attach the back box of type I camera/base plate of type II
camera to the in-ceiling mounting bracket with the supplied
screws.
Note:
In the supplied screw package, both self-tapping screws and
expansion blots are contained.
If the wall is cement, expansion blots are required to fix the
camera. If the wall is wooden, self-tapping screws are
required.
Type I Camera:
Type II Camera:
Figure 2. 8 Fix the Camera to the Mount
7. Repeat steps 6 to 9 of the 2.1.1 Ceiling Mounting section to
complete the installation.
2.1.4 In-Ceiling Mounting with Junction Box
Note:
You need to purchase an in-ceiling mounting bracket separately if
you adopt the in-ceiling mounting with the junction box.