
Quick Start Guide
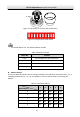
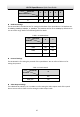
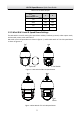
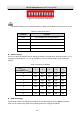
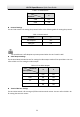
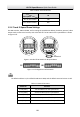


Table Of Contents
- 1 Installation
- 2 In-door Mounting Applications
- 3 Application and Operations
- 4 Troubleshooting

HD-TVI Speed Dome·Quick Start Guide
14
Figure 1-14 Secure the Mount
5. Install the speed dome to the mount. Refer to Section 1.3.4 Installing the Speed Dome for
installation details.
Follow the same instructions described above for the short-arm wall mount. For outdoor
applications, adopt the water-proof measures. The short-arm wall mount is not recommended
for outdoor applications.
1.3.3 Setting the DIP Switch
Set the address and baudrate for the speed dome. The default value of DIP switch is shown below:
Address: 0
Baudrate:2400
Terminal Resistor: OFF
Refer to the Section 1.2 DIP Switch Settings for DIP switch settings.
1.3.4 Installing the Speed Dome
The sketches of installing the speed dome are for reference only.
Steps:
1. Hang the safety rope to the speed dome, and then hook it to the mount as shown in Figure 1-15
(left).
2. Route the cables of the speed dome through the wall mount.
3. Connect the corresponding video/power/RS-485 cables.
4. Install the speed dome to the mount, and secure the speed dome by rotating the speed dome
clockwise.
5. Fasten the two lock screws with the Allen wrench, as shown in Figure 1-15 (right).