Digital Signage Quick Start Guide
Digital Signage Quick Start Guide TABLE OF CONTENTS Chapter 1 Product Introduction .................................................................................................. 1 Chapter 2 Typical Application ..................................................................................................... 2 Chapter 3 Activation ................................................................................................................... 4 3.1 Activation for Scene One .........................
Digital Signage Quick Start Guide Quick Start Guide COPYRIGHT © 2019 Hangzhou Hikvision Digital Technology Co., Ltd. ALL RIGHTS RESERVED. Any and all information, including, among others, wordings, pictures, graphs are the properties of Hangzhou Hikvision Digital Technology Co., Ltd. or its subsidiaries (hereinafter referred to be “Hikvision”).
Digital Signage Quick Start Guide Regulatory Information FCC Information Please take attention that changes or modification not expressly approved by the party responsible for compliance could void the user’s authority to operate the equipment. FCC compliance: This equipment has been tested and found to comply with the limits for a Class A digital device, pursuant to part 15 of the FCC Rules.
Digital Signage Quick Start Guide Symbol Conventions The symbols that may be found in this document are defined as follows. Symbol Description Provides additional information to emphasize or supplement important points of the main text. Indicates a potentially hazardous situation, which if not avoided, could result in equipment damage, data loss, performance degradation, or unexpected results. Indicates a hazard with a high level of risk, which if not avoided, will result in death or serious injury.
Digital Signage Quick Start Guide Chapter 1 Product Introduction Digital signage (hereinafter referred to as the terminal) displays are used to broadcast information, release news, and advertise products, etc, working together with other related products, such as information release servers and information release system, or the digital signage lite.
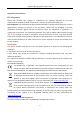
Digital Signage Quick Start Guide Chapter 2 Typical Application This chapter describes two typical application scenes for your reference. The two scenes are different and require different configuration of your terminals. Please strictly follow the operation instructions described in the following sections. Refer to the following table for the detailed description of the scene 1.
Digital Signage Quick Start Guide Refer to the following table for the detailed description of the scene2. Table 2-2 Scene 2 Description Feature Description Elements Client: Digital Signage Lite Terminal: Digital Signage Terminals Supported ≤ 30 Key Function Only one user is allowed for the client. Manage terminals on the client. Edit programs on the client. Create and schedules to terminals.
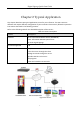
Digital Signage Quick Start Guide Chapter 3 Activation This chapter describes activation methods in two scenes. The way of activation in two scenes is different. Please select activation methods according to the scenes. 3.1 Activation for Scene One 3.1.1 Activate on the Client Before you start: Your computer used for running the client is on the same network segment with the terminal. Step 1 Run client software. Figure 3-1 Login Step 2 Click Online Device.
Digital Signage Quick Start Guide Figure 3-2 Online Device Step 3 Select terminal to activate and click Security Status. Figure 3-3 Network Information Step 4 Enter Password, enter the same password in Confirm Password text-field, and click Apply. Figure 3-4 Terminal Activation 3.1.2 Activate on the Terminal Step 1 Power on the terminal.
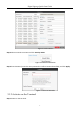
Digital Signage Quick Start Guide Step 2 Click ACTIVATE on activation interface. Step 3 Enter password and confirm password. Step 4 Click ACTIVATE. 3.1.3 Reset Password on the Client You are highly recommended to reset password with the help of our technical support. Step 1 Click Export to export the restoration file and send the file to our technical support. Figure 3-5 Reset Password Step 2 Technical support will send you back a file. Click Import and select the file.
Digital Signage Quick Start Guide Figure 3-6 Activate Terminal Step 5 Set the terminal password and confirm password. Step 6 Click OK. 3.2.2 Activate on the Terminal The way of activation on the terminal is the same in two scenes. To activate on the terminal, refer to 3.1.2 Activate on the Terminal.
Digital Signage Quick Start Guide Chapter 4 Registration This chapter describes registration methods in two scenes. The way of registration in two scenes is different. Please select registration methods according to the scenes. 4.1 Register Terminals for Scene One 4.1.1 Register on the Client Purpose: To register terminals to the information release server (hereinafter referred to as the server). Before you start: You have activated your terminals.
Digital Signage Quick Start Guide Figure 4-2 CMS Register Step 4 Enter server information, including Server IP Address, Server Port, server User Name, and Server Password. The server port is 7660 by default. You can change the server port as needed. Step 5 Enter a custom Terminal Name. Step 6 Enter the Terminal Password. Step 7 Click OK. Step 8 Optionally, click and enter Terminal Password to check registration status. 4.1.2 Register on the Terminal You can register your terminals on themselves.
Digital Signage Quick Start Guide Step 6 Set server parameters. Table 4-1 Server Parameters Parameter Description Example Device name User defined Device 1 IP address Server IP 10.11.5.224 Port Server Port 8000 Username Server username admin Password Server password Qaz1234 Step 7 Click Save. 4.2 Register Terminals for Scene Two 4.2.1 Register on the Client Register Terminals in the Same Network Segment Before you start: The terminal and the client are in the same network segment.
Digital Signage Quick Start Guide Step 5 Set IP type, IP address, and server port. Step 6 Enter terminal password. Step 7 Click OK. Step 8 Optionally, click Acquire Registration Status to view terminal registration status. Register Terminals by IP Address Step 1 Go to Terminal Management. Step 2 Click Add Terminal. Figure 4-3 Add Terminal Step 3 Select Adding Mode as Add by IP. Step 4 Enter Terminal IP Address and Port. Step 5 Enter Terminal Name and Terminal Password. Step 6 Click OK.
Digital Signage Quick Start Guide Step 3 Select Adding Mode. Figure 4-4 Add Terminal by Serial No. Step 4 Enter Terminal Name, Terminal Serial No. and Description. Description is optional. Step 5 Click OK. Step 6 Register the computer where information release client to terminal. 1) Enter information release software in terminal. 2) Click on the sidebar. 3) Enter the information of the computer and information release client on the server configuration interface. 4) Click Save. 4.2.
Digital Signage Quick Start Guide Chapter 5 Terminal Software Please start the information release software on your terminals manually if the software does not start automatically. Click on the side of the screen to expand the sidebar.
Digital Signage Quick Start Guide Table 5-2 Functions of System Settings Function Description Timed Startup/Shutdown If the terminal has the scheduled startup/shutdown. Click Enable/Disable to enable/disable the scheduled startup/shutdown. Timed Volume If the terminal has the scheduled volume. Click Enable/Disable to enable/disable the scheduled volume. Terminal Debugging Enable/Disable terminal debugging.
Digital Signage Quick Start Guide Chapter 6 Remote Control Operations 6.1 Remote Control One 6.1.
Digital Signage Quick Start Guide The No.10 Key becomes effective only when Information Release System is in TV Setting Mode. 6.1.2 Operation of Remote Control For DS-D6055UN-B and DS-D6055FN-B models of the digital signage, aim at the screen center with the remote control, as shown in Figure 6-1. For other models, aim at the bottom of the screen.
Digital Signage Quick Start Guide 6.2.1 Functions of Remote Control Keys Table 6-2 Remote Functions Appearance Key Description Power On/Off Back Delete / / Direction / OK Mute Decrease Volume Increase Volume 6.2.2 Remote Control Mode A remote control is divided into two modes: 1-1 mode and 1-N mode. 1-1 mode: a remote control is bound to one terminal. 1-N mode: a remote control is unbound to any one single terminal. A remote control is in 1VN comparison mode by default.
Digital Signage Quick Start Guide After being bound to the remote control, the terminal cannot be controlled by any other remote controls and the remote control cannot control any other terminals. Step 1 Long press key and key on the remote control at the same time until the terminal pops up the verification code. The system pops up a box for you to enter the verification code only when your terminals are unbound to any remote controls. Step 2 Enter the verification code of the desired terminal.
Digital Signage Quick Start Guide 19 UD14626B