
Installation Instructions


r = 100 m in free space, 30 m indoors (depending on construcon and obstrucons)
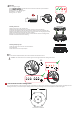
1. Turn on the power switch on the boom of the first detector.
2. Short press down the coding buon on the boom of the first detector, the red LED flashes slowly, approximately once every one second. Release the buon
then. Noce pressing the coding buon again will end the coding process.
3. Turn on the power switch on the boom of the second detector.
4. Short press down the coding buon on the boom of the second detector, the red LED flashes slowly, approximately once every one second. Then release
the buon.
5. wait and see…
At this me, the two detectors are in the coding mode. The period of coding is about 60 seconds.
If two green LEDs of the detectors are illuminated at the same me, no flashing, which indicates that two detectors have built a new wireless interconnecon, the
coding is successful. Otherwise, aer 60 seconds, two detectors will exit the coding mode automacally, please do it again. Please noce repeated press of coding
buon will also end the coding process.
6. To connect another smoke detector. Repeat above steps. First, choose the new smoke alarm you want to add. Then choose a smoke alarm already interconnect-
ed. The new smoke alarm shall join the exisng network. Repeat the above steps for other interconnected smoke alarms (up to 12).
7. Once all smoke alarms are interconnected, press the Test/Hush on each smoke alarm, and check the smoke alarm sounder operates on all interconnected smoke
alarms.
8. Check that the red LED adjacent to the Test/Hush buon operates only on the smoke alarm being tested.
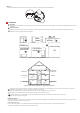
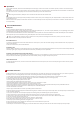
Smoke detectors should be interconnected within only one family residence. Otherwise, you might encounter nuisance alarms when a smoke detector is
operated or tested in another residence.
>50 cm
>50 cm
T
E
S
T
/
H
U
S
H
>50 cm
T
E
S
T
/
H
U
S
H
>50 cm
T
E
S
T
/
H
U
S
H
T
E
S
T
/
H
U
S
H
>50 cm