
Installation Instructions


1.Check the signal strength.
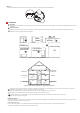
1.Draw a 150 mm line at the required place.
2.Rotate the mounng bracket counter -clockwise and remove it from the detector.
3. Align the two longest hole slots with the drawed line. Draw a mark In each of keyhole slots.
4.Drill two 5 mm (3/16-inch) holes at the marks and insert the plasc mounng plugs (supplied).
5.Aach the bracket to the ceiling with the screws supplied.
6.Align the slot of the bracket with the detector, push the detector onto the mounng bracket,
and rotate it clockwise to finish the mounng.
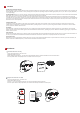
1.Paste the sponge tape on the rear side of the detector.
2.Tear off the film.
3.Paste the detector on the required place.
Press and hold the Test/Hush buon, and the buzzer and LED will indicates the alarm.
WARNING: The smoke alarm has a loud alarm signal. Use hearing protecon when tesng smoke alarms.
Test
Mounng with Screws
Mounng with Sponge Tape
Mounng
3
4
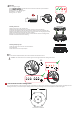
Up to 12 smoke detectors can be interconnected, with a typical distance of 30 m indoors and 100 m in free space. Interconnecon range depends on the
building construcon, and is influenced by the building structure and any intervening structures that may absorb or reflect radio signals.
5
Interconnect Funcon Configuraon
Interconnecon limitaons
7
9
11
3
6
4 12 1
2
5
200m
8
10
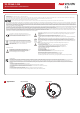
Tap the Signal Strength Test in the Hik-ProConnect to enter the mode and tap the test buon:
Solid green for 3 s - Strong Signal
Flashing green for 3 s - Medium Signal
Solid red for 3 s - Weak Signal
Flashing red for 3 s - Failure
Signal Strength Test
T
E
S
T
/
H
U
S
H
3 S
1 s 1 s
0.5 s 0.5 s 0.5 s 0.5 s 0.5 s 0.5 s
……
……
T
E
S
T
/
H
U
S
H
T
E
S
T
/
H
U
S
H
T
E
S
T
/
H
U
S
H