
User's Manual
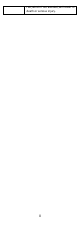
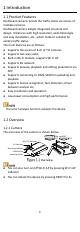
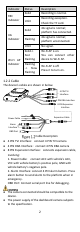
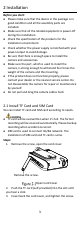
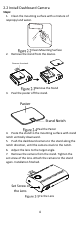
Table Of Contents
- 1 Introduction
- 2 Installation
- 2.1 Install TF Card and SIM Card
- 2.2 Install Dashboard Camera
- 1. Clean the mounting surface with a mixture of isopropyl and water.
- 2. Remove the stand from the device.
- 3. Peal the paster off the stand.
- 4. Paste the stand to the mounting surface with stand notch vertically downward.
- 5. Push the dashboard camera to the stand along the notch direction, until the camera stuck to the notch.
- 6. Adjust the lens to the target angle.
- 7. Remove the camera from the stand. Tighten the set screw of the lens. Attach the camera to the stand again. Installation finished.
- 2.3 Wiring and Start Device
- 1. (Optional) Connect TVI camera to the dashboard camera’s TVI interface according to needs.
- 2. Connect the dashboard camera’s power cable to the vehicle’s battery:
- a. Connect ACC with vehicle’s ACC;
- b. Connect VCC with vehicle battery’s positive pole;
- c. Connect GND with vehicle battery’s negative pole.
- 3. The dashboard camera starts automatically once the vehicle started. Check the recording indicator.
- If recording indicator is bright and steady, the camera is started normally.
- 3 Trouble Shooting

2
Indicator
Status
Description
REC
Indicator
Solid
Recording is normal.
Unlit
Recording exception.
Check the TF card.
4G
Indicator
Solid
4G signal is normal;
platform has connected.
Flashing
4G signal is normal;
platform unconnected.
Unlit
No signal.
Wi-Fi AP
Indicator
Solid->
Fast
Flashing
Wi-Fi AP is on.
You can connect other
device to Wi-Fi AP.
Flashing
-> Slow
Flashing
Wi-Fi AP is off.
Press it to turn on.
1.2.2 Cable
The device’s cables are shown in below.
8 PIN Expansion
Interface
4 PIN DBA Interface
4 PIN TVI
Interface
Power Cable
Alarm
Interface
OBD Port
Expansion Cable
Cable Description
4 PIN TVI Interface:connect 4 PIN TVI camera
4 PIN DBA Interface:connect 4 PIN DBA camera
8 PIN Expansion Interface:connects expansion cable,
involving:
1. Power Cable: connect ACC with vehicle’s ACC,
VCC with vehicle battery’s positive pole, GND with
vehicle battery’s negative pole.
2. Alarm Interface: connect 4 PIN alarm button. Press
alarm button to send alarm to the platform when in
emergency.
OBD Port: Connect serial port line for debugging.
The camera connected should be compatible to the
device.
The power supply of the dashboard camera subjects
to the specification.