
User's Manual
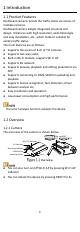
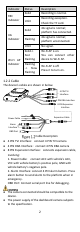
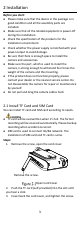
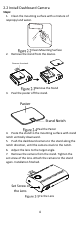
Table Of Contents
- 1 Introduction
- 2 Installation
- 2.1 Install TF Card and SIM Card
- 2.2 Install Dashboard Camera
- 1. Clean the mounting surface with a mixture of isopropyl and water.
- 2. Remove the stand from the device.
- 3. Peal the paster off the stand.
- 4. Paste the stand to the mounting surface with stand notch vertically downward.
- 5. Push the dashboard camera to the stand along the notch direction, until the camera stuck to the notch.
- 6. Adjust the lens to the target angle.
- 7. Remove the camera from the stand. Tighten the set screw of the lens. Attach the camera to the stand again. Installation finished.
- 2.3 Wiring and Start Device
- 1. (Optional) Connect TVI camera to the dashboard camera’s TVI interface according to needs.
- 2. Connect the dashboard camera’s power cable to the vehicle’s battery:
- a. Connect ACC with vehicle’s ACC;
- b. Connect VCC with vehicle battery’s positive pole;
- c. Connect GND with vehicle battery’s negative pole.
- 3. The dashboard camera starts automatically once the vehicle started. Check the recording indicator.
- If recording indicator is bright and steady, the camera is started normally.
- 3 Trouble Shooting

iv
When the product is mounted on wall or ceiling, the
device shall be firmly fixed.
If smoke, odor or noise rise from the device, turn off
the power at once and unplug the power cable, and
then please contact the service center.
If the product does not work properly, contact your
dealer or the nearest service center. Never attempt to
disassemble the camera by yourself. (We shall not
assume any responsibility for problems caused by
unauthorized repair or maintenance.)
Make sure the power supply voltage is correct before
using the camera.
Do not drop the camera or subject it to physical shock.
Do not touch senor modules with fingers. If cleaning is
necessary, use clean cloth with a bit of ethanol and
wipe it gently. If the camera will not be used for an
extended period, replace the lens cap to protect the
sensor from dirt.
Do not aim the camera at the sun or extra bright
places. Blooming or smearing may occur otherwise
(which is not a malfunction), and affect the endurance
of sensor at the same time.
The sensor may be burned out by a laser beam, so
when any laser equipment is in using, make sure that
the surface of sensor will not be exposed to the laser
beam.
Do not place the camera in extremely hot, cold, dusty
or damp locations, and do not expose it to high
electromagnetic radiation.
To avoid heat accumulation, good ventilation is
required for operating environment.
Keep the camera away from liquid while in use.
While in delivery, the camera shall be packed in its
original packing, or packing of the same texture.
Symbol Conventions
The symbols that may be found in this document are
defined as follows.
Symbol
Description
Provides additional information to
emphasize or supplement important
points of the main text.
Indicates a potentially hazardous
situation, which if not avoided, could
result in equipment damage, data
loss, performance degradation, or
unexpected results.
Indicates a hazard with a high level of