
User's Manual
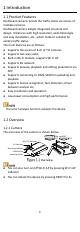
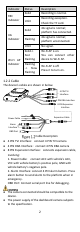
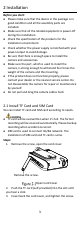
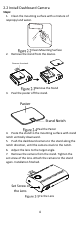
Table Of Contents
- 1 Introduction
- 2 Installation
- 2.1 Install TF Card and SIM Card
- 2.2 Install Dashboard Camera
- 1. Clean the mounting surface with a mixture of isopropyl and water.
- 2. Remove the stand from the device.
- 3. Peal the paster off the stand.
- 4. Paste the stand to the mounting surface with stand notch vertically downward.
- 5. Push the dashboard camera to the stand along the notch direction, until the camera stuck to the notch.
- 6. Adjust the lens to the target angle.
- 7. Remove the camera from the stand. Tighten the set screw of the lens. Attach the camera to the stand again. Installation finished.
- 2.3 Wiring and Start Device
- 1. (Optional) Connect TVI camera to the dashboard camera’s TVI interface according to needs.
- 2. Connect the dashboard camera’s power cable to the vehicle’s battery:
- a. Connect ACC with vehicle’s ACC;
- b. Connect VCC with vehicle battery’s positive pole;
- c. Connect GND with vehicle battery’s negative pole.
- 3. The dashboard camera starts automatically once the vehicle started. Check the recording indicator.
- If recording indicator is bright and steady, the camera is started normally.
- 3 Trouble Shooting

4
2.2 Install Dashboard Camera
Steps:
1. Clean the mounting surface with a mixture of
isopropyl and water.
Clean Mounting Surface
2. Remove the stand from the device.
Remove the stand.
Remove the Stand
3. Peal the paster off the stand.
Paster
Stand Notch
Peal the Paster
4. Paste the stand to the mounting surface with stand
notch vertically downward.
5. Push the dashboard camera to the stand along the
notch direction, until the camera stuck to the notch.
6. Adjust the lens to the target angle.
7. Remove the camera from the stand. Tighten the
set screw of the lens. Attach the camera to the stand
again. Installation finished.
Set Screw of
the Lens
Fix the Lens