
User manual


User Manual of Digital Video Recorder
70
5.2 Configuring Record/Capture Schedule
Purpose:
Set the record schedule, and then the camera automatically starts/stops recording according to the configured
schedule.
In this chapter, we take the record schedule procedure as an example, and the same procedure can be applied to
configure schedule for both continuous recording and capture. To schedule the automatic capture, you need to
choose the Capture tab in the Schedule interface.
We use the interface of DS-9000HFI-ST series (unless otherwise stated) as example to describe the following
settings.
Steps:
1. Enter the Record Schedule interface.
Menu > Record > Schedule
2. Configure Record Schedule
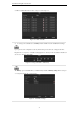
1) Select Record / Capture Schedule.
Figure 5. 10 Record Schedule
2) Choose the camera you want to configure.
3) Check checkbox to enable record schedule.
There are two ways to configure the record schedule.
Task 1: Edit the Schedule
Steps:
1) Click Edit.
2) In the message box, you can choose the day which you want to set schedule.
3) To schedule an all-day recording, check checkbox to enable all-day recording.
4) Set the Type in the drop-down list, including Continuous, Motion, Alarm, Motion | Alarm and
Motion & Alarm.
To enable Motion, Alarm, Motion | Alarm (motion or alarm) and Motion & Alarm (motion and alarm)
triggered recording and capture, you must configure the motion detection settings or alarm input settings