
User manual
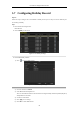
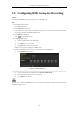
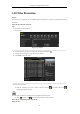


Table Of Contents
- Product Key Features
- Chapter 1 Introduction
- Chapter 2 Getting Started
- Chapter 3 Live View
- Chapter 4 PTZ Controls
- Chapter 5 Recording Settings
- 5.1 Configuring Recording Parameters
- 5.2 Configuring Record Schedule
- 5.3 Configuring Motion Detection Record
- 5.4 Configuring Alarm Triggered Record
- 5.5 Configuring VCA Record
- 5.6 Configuring Manual Record
- 5.7 Configuring Holiday Record
- 5.8 Configuring Redundant Recording
- 5.9 Configuring HDD Group for Recording
- 5.10 Files Protection
- Chapter 6 Playback
- Chapter 7 Backup
- Chapter 8 Alarm Settings
- Chapter 9 Network Settings
- Chapter 10 HDD Management
- Chapter 11 Camera Settings
- Chapter 12 DVR Management and Maintenance
- Chapter 13 Others
- Appendix

User Manual of Digital Video Recorder
94
5.9 Configuring HDD Group for Recording
Purpose:
You can group the HDDs and save the record files in certain HDD group.
Steps:
1. Enter HDD setting interface.
Menu>HDD>Advanced
2. Select Advanced on the left bar.
Check whether the storage mode of the HDD is Group. If not, set it to Group. For detailed information,
please refer to Chapter 10.4 Managing HDD Group.
3. Select General in the left bar.
Click to enter editing interface.
4. Configuring HDD group.
1) Choose a group number for the HDD group.
2) Click Apply to save your settings.
3) Click OK to back to the upper level menu.
Repeat the above steps to configure more HDD groups.
5. Choose the Channels which you want to save the record files in the HDD group.
1) Select Advanced on the left bar.
Figure 5. 28 HDD Advanced
2) Choose Group number in the dropdown list of Record on HDD Group
3) Check the channels you want to save in this group.
4) Click Apply to save settings.
After you have configured the HDD groups, you can configure the Recording settings following the procedure
provided in Chapter 5.2-5.7.