
User manual
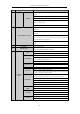
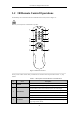
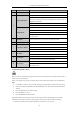

Table Of Contents
- Product Key Features
- Chapter 1 Introduction
- Chapter 2 Getting Started
- Chapter 3 Live View
- Chapter 4 PTZ Controls
- Chapter 5 Recording Settings
- 5.1 Configuring Recording Parameters
- 5.2 Configuring Record Schedule
- 5.3 Configuring Motion Detection Record
- 5.4 Configuring Alarm Triggered Record
- 5.5 Configuring VCA Record
- 5.6 Configuring Manual Record
- 5.7 Configuring Holiday Record
- 5.8 Configuring Redundant Recording
- 5.9 Configuring HDD Group for Recording
- 5.10 Files Protection
- Chapter 6 Playback
- Chapter 7 Backup
- Chapter 8 Alarm Settings
- Chapter 9 Network Settings
- Chapter 10 HDD Management
- Chapter 11 Camera Settings
- Chapter 12 DVR Management and Maintenance
- Chapter 13 Others
- Appendix

User Manual of Digital Video Recorder
24
1.2 IR Remote Control Operations
The DVR may also be controlled with the included IR remote control, shown in Figure 1. 8.
Batteries (2×AAA) must be installed before operation.
Figure 1. 8 Remote Control
The keys on the remote control closely resemble the ones found on the front panel. Refer to Table 1. 7, they
include:
Table 1. 7 Description of the IR Remote Control Buttons
No.
Name
Description
1
POWER
Power on/off the device.
Power on/off the device by pressing and holding the button for 3 seconds.
2
MENU Button
Press the button to return to the main menu (after successful login).
Press and hold the button for 5 seconds will turn off audible key beep.
In PTZ Control mode, the MENU button will start wiper (if applicable).
In Playback mode, it is used to show/hide the control interface.
3
REC Button
Enter the Manual Record setting menu.
In PTZ control settings, press the button and then you can call a PTZ preset
by pressing Numeric button.