
User manual
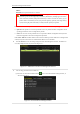

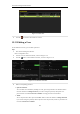
Table Of Contents
- Product Key Features
- Chapter 1 Introduction
- Chapter 2 Getting Started
- Chapter 3 Live View
- Chapter 4 PTZ Controls
- Chapter 5 Recording Settings
- 5.1 Configuring Recording Parameters
- 5.2 Configuring Record Schedule
- 5.3 Configuring Motion Detection Record
- 5.4 Configuring Alarm Triggered Record
- 5.5 Configuring VCA Record
- 5.6 Configuring Manual Record
- 5.7 Configuring Holiday Record
- 5.8 Configuring Redundant Recording
- 5.9 Configuring HDD Group for Recording
- 5.10 Files Protection
- Chapter 6 Playback
- Chapter 7 Backup
- Chapter 8 Alarm Settings
- Chapter 9 Network Settings
- Chapter 10 HDD Management
- Chapter 11 Camera Settings
- Chapter 12 DVR Management and Maintenance
- Chapter 13 Others
- Appendix

User Manual of Digital Video Recorder
197
Address.
Password: Set the password for the user account.
STRONG PASSWORD RECOMMENDED– We highly recommend you create a strong
password of your own choosing (using a minimum of 8 characters, including upper case letters,
lower case letters, numbers, and special characters) in order to increase the security of your
product. And we recommend you reset your password regularly, especially in the high security
system, resetting the password monthly or weekly can better protect your product.
Level: Set the user level to Operator or Guest. Different user levels have different operating permission.
• Operator: The Operator user level has permission of Two-way Audio in Remote Configuration and all
operating permission in Camera Configuration by default.
• Guest: The Guest user has no permission of Two-way Audio in Remote Configuration and only has the
local/remote playback in the Camera Configuration by default.
User’s MAC Address: The MAC address of the remote PC which logs onto the NVR. If it is configured and
enabled, it only allows the remote user with this MAC address to access the NVR.
4. Click the OK button to save the settings and go back to the User Management interface. The added new
user will be displayed on the list, as shown in Figure 13. 7.
Figure 13. 7 Added User Listed in User Management Interface
5. You can assign permissions for the added user.
(1) Select the user from the list and then click the button to enter the Permission settings interface, as
shown in Figure 13. 8.
Figure 13. 8 User Permission Settings Interface