
User manual
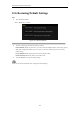

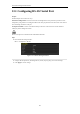
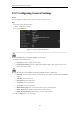
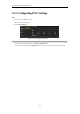
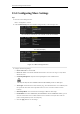

Table Of Contents
- Product Key Features
- Chapter 1 Introduction
- Chapter 2 Getting Started
- Chapter 3 Live View
- Chapter 4 PTZ Controls
- Chapter 5 Recording Settings
- 5.1 Configuring Recording Parameters
- 5.2 Configuring Record Schedule
- 5.3 Configuring Motion Detection Record
- 5.4 Configuring Alarm Triggered Record
- 5.5 Configuring VCA Record
- 5.6 Configuring Manual Record
- 5.7 Configuring Holiday Record
- 5.8 Configuring Redundant Recording
- 5.9 Configuring HDD Group for Recording
- 5.10 Files Protection
- Chapter 6 Playback
- Chapter 7 Backup
- Chapter 8 Alarm Settings
- Chapter 9 Network Settings
- Chapter 10 HDD Management
- Chapter 11 Camera Settings
- Chapter 12 DVR Management and Maintenance
- Chapter 13 Others
- Appendix

User Manual of Digital Video Recorder
195
13.4 Configuring More Settings
Steps:
1. Enter the General Settings interface.
Menu > Configuration > General
2. Click the More Settings tab to enter the More Settings interface, as shown in Figure 13.3.
DS-7100-SH, DS-7200-SH, DS-7324/7332HGHI and DS-8124/8132HGHI
DS-7100/7200-E1(E2)
Other Models
Figure 13. 4 More Settings Interface
3. Configure the following settings:
• Device Name: Edit the name of DVR.
• Device No.: Edit the serial number of DVR. The Device No. can be set in the range of 1~255, and the
default No. is 255.
• CVBS Output Brightness: Adjust the video output brightness via the CVBS interface.
DS-7100, DS-7200, DS-7324/7332HGHI and DS-8124/8132HGHI provide no CVBS output.
• Auto Logout: Set timeout time for menu inactivity. E.g., when the timeout time is set to 5 Minutes, then
the system will exit from the current operation menu to live view screen after 5 minutes of menu
inactivity.
• Menu Output Mode: You can choose the menu display on different video output.
• Encode Mode: For the DS-7100HGHI-E1, DS-7200HGHI-E1 and DS-7200HGHI-E2 models, you can
select the encode mode or non-real mode. When the non-real mode is selected, the max. frame rate
(menu>record>parameters) can be set to 15fps only.
• Click the Apply button to save the settings.