
User manual
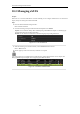
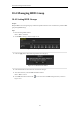
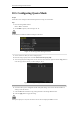
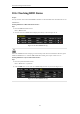
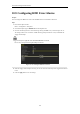
Table Of Contents
- Product Key Features
- Chapter 1 Introduction
- Chapter 2 Getting Started
- Chapter 3 Live View
- Chapter 4 PTZ Controls
- Chapter 5 Recording Settings
- 5.1 Configuring Recording Parameters
- 5.2 Configuring Record Schedule
- 5.3 Configuring Motion Detection Record
- 5.4 Configuring Alarm Triggered Record
- 5.5 Configuring VCA Record
- 5.6 Configuring Manual Record
- 5.7 Configuring Holiday Record
- 5.8 Configuring Redundant Recording
- 5.9 Configuring HDD Group for Recording
- 5.10 Files Protection
- Chapter 6 Playback
- Chapter 7 Backup
- Chapter 8 Alarm Settings
- Chapter 9 Network Settings
- Chapter 10 HDD Management
- Chapter 11 Camera Settings
- Chapter 12 DVR Management and Maintenance
- Chapter 13 Others
- Appendix

User Manual of Digital Video Recorder
174
10.5 Configuring Quota Mode
Purpose
Each camera can be configured with allocated quota for the storage of recorded files.
Steps
1. Enter the Storage Mode interface.
Menu > HDD > Advanced
2. Set the Mode to Quota, as shown in Figure 10. 18.
The DVR must be rebooted to enable the changes to take effect.
Figure 10. 18 Storage Mode Settings Interface
3. Select a camera for which you want to configure quota.
4. Enter the storage capacity in the text field of Max. Record Capacity (GB).
5. You can copy the quota settings of the current camera to other cameras if required. Click the Copy button to
enter the Copy Camera interface, as shown in Figure 10. 19.
Figure 10. 19 Copy Settings to Other Camera(s)
6. Select the camera (s) to be configured with the same quota settings. You can also click the checkbox of
Analog to select all cameras.
7. Click the OK button to finish the Copy settings and back to the Storage Mode interface.
8. Click the Apply button to apply the settings.
If the quota capacity is set to 0, then all cameras will use the total capacity of HDD for record.