
User manual
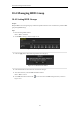
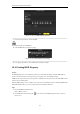
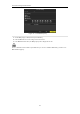
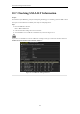
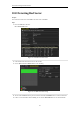
Table Of Contents
- Product Key Features
- Chapter 1 Introduction
- Chapter 2 Getting Started
- Chapter 3 Live View
- Chapter 4 PTZ Controls
- Chapter 5 Recording Settings
- 5.1 Configuring Recording Parameters
- 5.2 Configuring Record Schedule
- 5.3 Configuring Motion Detection Record
- 5.4 Configuring Alarm Triggered Record
- 5.5 Configuring VCA Record
- 5.6 Configuring Manual Record
- 5.7 Configuring Holiday Record
- 5.8 Configuring Redundant Recording
- 5.9 Configuring HDD Group for Recording
- 5.10 Files Protection
- Chapter 6 Playback
- Chapter 7 Backup
- Chapter 8 Alarm Settings
- Chapter 9 Network Settings
- Chapter 10 HDD Management
- Chapter 11 Camera Settings
- Chapter 12 DVR Management and Maintenance
- Chapter 13 Others
- Appendix

User Manual of Digital Video Recorder
170
10.3 Managing eSATA
Purpose:
When there is an external eSATA device connected to DVR, you can configure eSATA for the use of Record or
Export, and you can manage the eSATA in the DVR.
Steps:
1. Enter the Advanced Record Settings interface.
Menu >Record>Advanced
2. Select the eSATA type to Export or Record from the dropdown list of eSATA.
Export: use the eSATA for backup. Refer to Backup using eSATA HDDs in Chapter 7.1.1 Backing up by
Normal Video Search for operating instructions.
Record: use the eSATA for record. Refer to the following steps for operating instructions.
Figure 10. 11 Set eSATA Mode
3. When the eSATA type is selected to Record, enter the HDD Information interface.
Menu > HDD>General
4. Edit the property of the selected eSATA, or initialize it is required.
Two storage modes can be configured for the eSATA when it is used for Record. Please refer to Chapter 10.4
Managing HDD Group and Chapter 10.5 Configuring Quota Mode for details.
Figure 10. 12 Initialize Added eSATA