
User manual
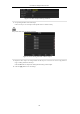
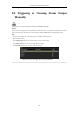

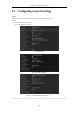

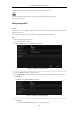
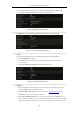
Table Of Contents
- Product Key Features
- Chapter 1 Introduction
- Chapter 2 Getting Started
- Chapter 3 Live View
- Chapter 4 PTZ Controls
- Chapter 5 Recording Settings
- 5.1 Configuring Recording Parameters
- 5.2 Configuring Record Schedule
- 5.3 Configuring Motion Detection Record
- 5.4 Configuring Alarm Triggered Record
- 5.5 Configuring VCA Record
- 5.6 Configuring Manual Record
- 5.7 Configuring Holiday Record
- 5.8 Configuring Redundant Recording
- 5.9 Configuring HDD Group for Recording
- 5.10 Files Protection
- Chapter 6 Playback
- Chapter 7 Backup
- Chapter 8 Alarm Settings
- Chapter 9 Network Settings
- Chapter 10 HDD Management
- Chapter 11 Camera Settings
- Chapter 12 DVR Management and Maintenance
- Chapter 13 Others
- Appendix

User Manual of Digital Video Recorder
148
P2P application is installed or by the EZVIZ website (http://www.ezviz7.com).
For more operation instructions, please refer to the help file on the EZVIZ official website
(http://www.ezviz7.com).
Configuring DDNS
Purpose:
If your DVR is set to use PPPoE as its default network connection, you may set Dynamic DNS (DDNS) to be
used for network access.
Prior registration with your ISP is required before configuring the system to use DDNS.
Steps:
1. Enter the Network Settings interface.
Menu > Configuration > Network
2. Select the DDNS tab to enter the DDNS Settings interface.
Figure 9. 3 DDNS Settings Interface
3. Check the DDNS checkbox to enable this feature.
4. Select DDNS Type. Five different DDNS types are selectable: IPServer, DynDNS, PeanutHull, NO-IP
and HiDDNS.
IPServer: Enter Server Address for IPServer.
Figure 9. 4 IPServer Settings Interface
DynDNS:
1) Enter Server Address for DynDNS (i.e. members.dyndns.org).