
User manual

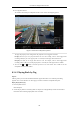

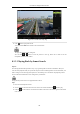
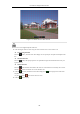
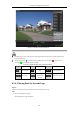
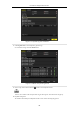
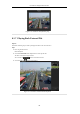
Table Of Contents
- Product Key Features
- Chapter 1 Introduction
- Chapter 2 Getting Started
- Chapter 3 Live View
- Chapter 4 PTZ Controls
- Chapter 5 Recording Settings
- 5.1 Configuring Recording Parameters
- 5.2 Configuring Record Schedule
- 5.3 Configuring Motion Detection Record
- 5.4 Configuring Alarm Triggered Record
- 5.5 Configuring VCA Record
- 5.6 Configuring Manual Record
- 5.7 Configuring Holiday Record
- 5.8 Configuring Redundant Recording
- 5.9 Configuring HDD Group for Recording
- 5.10 Files Protection
- Chapter 6 Playback
- Chapter 7 Backup
- Chapter 8 Alarm Settings
- Chapter 9 Network Settings
- Chapter 10 HDD Management
- Chapter 11 Camera Settings
- Chapter 12 DVR Management and Maintenance
- Chapter 13 Others
- Appendix

User Manual of Digital Video Recorder
100
If there are record files for that camera in that day, in the calendar, the icon for that day is displayed as .
Otherwise it is displayed as
Playback Interface
You can use the toolbar in the bottom part of Playback interface to control playing progress, as shown in the
following figure.
Figure 6. 4 Playback Interface
Click the channel(s) if you want to switch playback to another channel or execute simultaneous playback
of multiple channels.
Figure 6. 5 Toolbar of Playback
Table 6. 1 Detailed Explanation of Playback Toolbar
Button
Operation
Button
Operation
Button
Operation
/
Mute/Audio on
/
Start/Stop clipping
Save clip(s)
Add default tag
Add customized tag
Tag management
Digital Zoom
/
Pause/
Play Reverse
Stop
30s backward
30s forward
Previous day
Slow forward
Fast forward
Next day