User manual
Table Of Contents
- Chapter 1 Overview
- Chapter 2 Network Connection
- Chapter 3 Access to the Network Speed Dome
- Chapter 4 Live View
- Chapter 5 PTZ Configuration
- Chapter 6 Speed Dome Configuration
- 6.1 Configuring Local Parameters
- 6.2 Configuring Time Settings
- 6.3 Configuring Network Settings
- 6.3.1 Configuring TCP/IP Settings
- 6.3.2 Configuring Port Settings
- 6.3.3 Configuring PPPoE Settings
- 6.3.4 Configuring DDNS Settings
- 6.3.5 Configuring SNMP Settings
- 6.3.6 Configuring 802.1X Settings
- 6.3.7 Configuring QoS Settings
- 6.3.8 Configuring FTP Settings
- 6.3.9 Configuring UPnP™ Settings
- 6.3.10 Configuring NAT (Network Address Translation) Settings
- 6.3.11 Configuring Email Settings
- 6.4 Configuring Video and Audio Settings
- 6.5 Configuring Image Settings
- 6.6 Configuring and Handling Alarms
- Chapter 7 Record Settings
- Chapter 8 Playback
- Chapter 9 Log Searching
- Chapter 10 Others
- Appendix

User Manual of Network Speed Dome
© Hikvision
74
Chapter 7 Record Settings
Before you start:
To configure record settings, please make sure that you have the network storage
device within the network or the Micro SD card inserted in your speed dome.
7.1 Configuring NAS Settings
Before you start:
The network disk should be available within the network and properly configured to
store the recorded files, log files, etc.
Steps:
1. Add the network disk
(1) Enter the NAS (Network-Attached Storage) Settings interface:
Configuration > Advanced Configuration > Storage > NAS
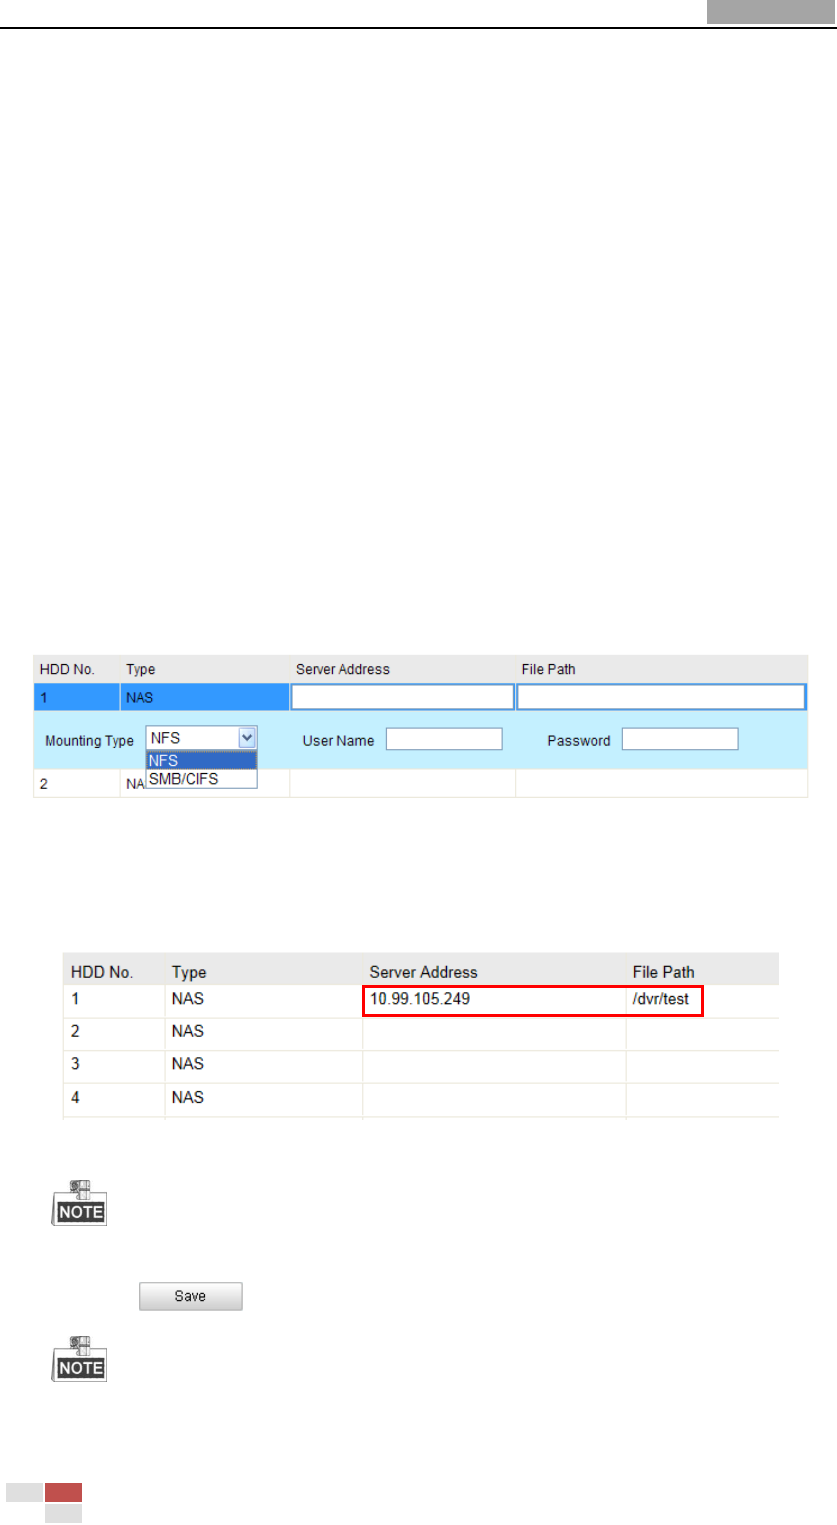
(2) Select the NAS type as NFS or SMB/CIFS. If you select SMB/CIFS, you need to
enter the User Name and Password.
Figure 7-1 Select NAS Type
(3) Enter the IP address of the network disk. The default NFS storage format of
file path is /dvr/test as shown in Figure 7-2. And the default SMB/CIFS
storage format of file path is /test.
Figure 7-2 Add Network Disk
The network disk file path name share is user-defined while creating the DVR
network storage. Please refer to the User Manual of NAS for creating the file path.
(4) Click to add the network disk.
After having saved successfully, you need to reboot the speed dome to activate the
settings.
2. Initialize the added network disk.


