
User manual


E-series High-definition Camera·User Manual
28
28
2. Route the cables inside the ceiling or on the surface. If you want to route the
cables inside the ceiling, drill the cable hole in the ceiling for wiring; pull all
cables through the hole and terminate all wires (if not already terminated).
3. Connect the video cable and power cable and secure the mounting base
with camera to the wall with supplied screws.
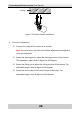
Figure 2-28 Secure the Camera
4. Three-axis adjustment.
1). Rotate the panning axis to adjust the panning position of the camera.
The adjustment range is from 0 degree to 360 degree.
2). Loosen the lock screw-1, and rotate the tilting axis to adjust the tilting
position of the camera. The adjustment range is from 0 degree to 90
degree.
3). Tighten the tilting axis lock screw-1.
4). Loosen the lock screw-2, and rotate the rotation axis to adjust the
azimuth angle of the image.