
Installation manual


Installation Manual of Network Camera
32
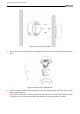
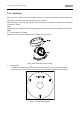
There are two cable outlet methods. One is to route the cables through the cable hole, and the
other is to route the cables through the side outlet shown below.
Figure 3-44 Side Outlet
Note:
Three side outlets on the enclosure are selectable, which makes routing the cables easier instead of
drilling a cable hole on the ceiling. Use a plier to remove the plastic and route the cables through
the hole.
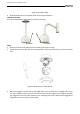
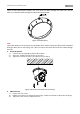
3. Install the Camera
1). Connect the corresponding power/video cables.
2). Insert the supplied screws to the screw holes.
3). Tighten the screws to secure the camera to the ceiling.
Figure 3-45 Secure the Camera to the Ceiling
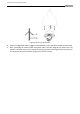
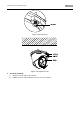
4. Adjust the Lens
1). Loosen the lock screw.
2). Rotate the enclosure to adjust the pan angle; rotate the camera to adjust the tilt angle.
3). Tighten the lock screw to clamp the lens.