
Installation manual


Installation Manual of Network Camera
31
3.3.2 Installation
Before you start, please verify the package contents are correct by checking the items against the
packing list, and make sure all the components are included.
Wall mounting is preferred. We will take wall mounting as an example to explain the installation
steps in this section.
Note:
Please make sure that the wall is strong enough to withstand three times the weight of the camera.
Steps:
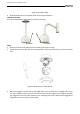
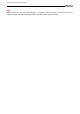
1. Dissembling the Trim Ring
Rotate the trim ring counterclockwise to remove it from the camera.
Figure 3-42 Dissembling the Trim Ring
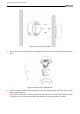
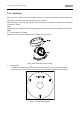
2. Drill the Holes
1) Attach the supplied drill template to the position where you want to fix the camera.
2) Drill the screw holes and the cable hole on the ceiling according to the drill template.
Figure 3-43 The Drill Template