HUMANE CONTAIN Model X-10 Rechargeable, Multi-Function Electronic Dog Fence Ultra-System INSTALLATION, OPERATING AND TRAINING MANUAL Please read this entire manual and study all illustrations before you begin installing your system
Your new Humane Contain TM, model X-10 Professional Series Electronic Dog Fence, represents the most advanced state of pet containment technology available today. This all new product features a super advanced transmitter, ultra-slim, rechargeable, multi-function collar and our proprietary Pulsed Proportional Stimulus TM System, a unique combination of progressively increasing sound and shock stimuli to train your pet quickly and safely.
Table of Contents PART 1 – INTRODUCTION . . . . . . . . . . . . . . . . . . . . . . . . . . . . . . . . . . 4 SYSTEM COMPONENTS:. . . . . . . . . . . . . . . . . . . . . . . . . . . . . . . . 4 KEY FEATURES: . . . . . . . . . . . . . . . . . . . . . . . . . . . . . . . . . . . . . . . 4 PART 2 - DETAILED SYSTEM DESCRIPTION. . . . . . . . . . . . . . . . . . . 7 TX-1 BASE STATION TRANSMITTER. . . . . . . . . . . . . . . . . . . . . . . 7 RX-10 ULTRA-SLIM RECEIVER COLLAR. . . . . . . . . . . . . . . . . . .
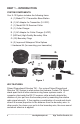
PART 1 – INTRODUCTION SYSTEM COMPONENTS: Your X-10 System includes the following items. A. (1) Model TX-1 Transmitter Base Station B. (1) AC Adapter for Transmitter (16 VDC) C. (1) Model RX-10 Receiver Collar D. (1) Collar Charger E. (1) AC Adapter for Collar Charger (9 VDC) F. (500 feet) High Quality Boundary Wire G. (50) Boundary Flags H. (3) Improved Waterproof Wire Splices I.
How Pulsed Proportional Stimulus Works: Stimulus Pulse Rate (Increases as dog approaches the boundary wire) Pulses per Second Buried Boundary Wire Figure 2 The unique shock stimulus used by your X-10 system is delivered in short, intense pulses, not a continuous shock. The pulsed stimulus gives your dog a chance to think and avoids sending the animal into panic.
sensation increases as he (or she) gets closer to the boundary. That is why you will find that the tone generated by our RX-10 collar is louder than the non-progressive tones used on competing systems and that the sonic pulse rate increases just as the shock pulse rate does as your dog moves closer to the boundary wire. Digital Signal: The X-10 sends a digital code embedded in the radio signal that is picked up and digitally decoded by a computer processor in the receiver collar.
PART 2 - DETAILED SYSTEM DESCRIPTION TX-1 BASE STATION TRANSMITTER FIELD WIDTH CONTROL CABLE BREAK ALARM 10 POWER BOOST SWITCH ON / OFF SWITCH SYSTEM STATUS DISPLAY Figure 3 General Description The Model TX-1 Base Station Transmitter contains numerious advanced features not found on competing systems. The TX-1 emits a radio signal that contains a special, digital code. This code must be received and recognized by the receiver collar before the collar will administer any stimulus to your pet.
DISPLAY FUNCTIONS: SYSTEM: This is the overall status of your base station. If everything is functioning normally the “OK” lamp to the right of the “SYSTEM” lamp will illuminate. If there is any malfunction, the “FAIL” lamp will illuminate. BATT: Back-up battery charge indicator. This indicator is only functional if there is an optional, rechargeable back-up battery installed. When the base station is in battery mode and the battery has a full charge, the “OK” lamp will illuminate.
and distance your dog has to properly react to the system. However, if yard space is limited, the field width can be reduced to just a few feet by turning the Field Width dial counter-clockwise. When you vary the effective field width of your system, the X-10’s unique Pulsed Proportional Stimulus System will automatically adjust to the new field strength setting.
M E CON T AN A W ER PET D O O Y ND BA RRI BAR RI R RD U E R R A O E S R PO IN HU RX-10 MULTI-FUNCTION RECEIVER COLLAR O A D I M AT The heart of our Humane Contain electronic fence technology lies here in the super advanced, Model RX-10 Radio Receiver Collar. The miniaturized, microprocessor driven circuitry is protected by a rugged, water resistant casing.
NOTE: THE TEST BUTTON TRIGGERS ACTUAL STIMULUS OUTPUT. DO NOT USE WHEN THE COLLAR IS ON THE ANIMAL. Do not touch the probes when depressing the Test Button. 3. T EST LIGHT: When the collar is in normal mode this light blinks with every shock pulse generated. When the collar is in test node, illumination indicates good battery condition. 4. T ONE SPEAKER: Emits an audible training tone whenever a shock pulse is being generated.
TONE SPEAKER: • If the speaker produces an audible tone or beep, the shocking circuit is functioning properly. • If there is no tone or no beep, the shocking circuit is not working and the unit should be repaired. The water resistant casing is moisture sealed for safe operation in all weather conditions. If the TONE SPEAKER gets wet, you will notice that the tone output becomes muffled or stops altogether. This is due to water on the outside of the speaker face.
per charge in the initial stages of use. Once the pet has learned the boundary, a battery charge should last two to three weeks or more on average. Battery life between charges is highly dependent on your pet’s behavior. Some pets will always require shocks to remind them where the boundaries lie. Others will avoid the boundary completely. When your pet is past the training phase we suggest you recharge on a fixed schedule.
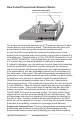
PART 3 - STEP BY STEP INSTALLATION STEP 1: Plan Your System Layout This is the most important step. Be sure to take the time to plan carefully. This will avoid time consuming corrections to your installation. Before beginning installation of your system we recommend you make an aerial sketch of your yard such as the one shown in Figure 6. Your sketch should include all buildings, large plants, trees, walks, driveway, pool and other important details. Then sketch in where you plan to place the boundary wire.
TYPICAL LAYOUT FOR BOUNDARIES WITHIN BOUNDARY Pond Twisted To Pond Twisted To Pool House Pool Garage Boundary Wire Twisted Wire Garden Property Line Transmitter Mounted in Garage Splice Splice Twisted Wire Cancels Field Figure 6 _________________________________________________________________________________ High Tech Pet Products, Inc. www.hightechpet.
Calculate the total length of wire required to ensure that you have enough to complete the installation. Remember that twisted wire counts as twice its length since there are two strands. Figure 7 shows a basic wire length calculation. In preparing your layout, note that you will need to allow for a field width of at least 3 feet (preferably 6 – 10 ft.) on each side of the boundary wire. Your dog will need at least another 5 to 10 ft. for a safe roaming area.
For the system to work properly, the wire must make a continuous loop. The signal is transmitted from one terminal of the transmitter through the wire and back to the other terminal. Twisting two adjacent sections of the wire loop cancels the signal along the twisted length. So use the twisted wire from the transmitter out to the exterior loop as shown in Figure 8. This allows the dog to cross the area without receiving a correction.
Adding a GATE MAKING A CONTAINMENT FIELD WITH A GATE GATE GATE WIDE If you want a permanent opening or gate in GATE the containment field, you must use what is commonly called a double loop, as shown Wire Wire in Figure 9. Carefully follow the current NARROW around the wiring and you will realize that GATE this layout is actually still a single loop of Wire Wire wire that is folded back upon itself. If the gate is narrow, you may have to reduce the boundary field next to the gate.
DO NOT DO THIS! A common error is trying to replace a section of single loop wire with a piece of twisted wire to create a gate as shown in Figure 11. This will not work. In order to create a gate, you must run a double loop as shown in Figures 9 and 10 above.
STEP 2: Assemble the Required Tools Here is the list of tools you will need. 1. Straight edge spade or power edger 2. Wire cutter/stripper 3. Power drill with 1/8” drill bit 4. Phillips screwdriver or Phillips driver bit for your drill STEP 3: Set Up the Base Station Transmitter Mounting: A. Separate Mounting Base From Electronics Console. C: Install Optional Rechargeable Battery if Desired. B: Mount the Mounting Base to Your Wall. D.
The TX-1 casing is assembled in two parts, the mounting base and the electronics console. In the package, they are assembled together. You must first separate the mounting base from the console. This is easily done by simply pulling them apart. Hold the mounting base in one hand and the console in the other and firmly pull apart. The snap closures will separate. A. Using the four mounting screws provided, mount the Mounting Base in its desired location. B.
Splicing the Boundary Wire: You may find the included improved waterproof wire splices useful in connecting individual lengths of wire or twisted wire. To use these connectors: 1. Push the two ends of the wires into the outer two holes in the splice. View from the bottom to make sure the wires are fully inserted. 2. Using pliers squeeze the top black button down solidly until it bottoms out. Additional splices are available from www.hightechpet.
Crossing a Driveway or Walk When crossing a driveway or sidewalk, you may be able to find an expansion joint into which you can place the wire. Remove any calking material in the joint, place the wire and re-caulk. If an expansion joint is not available, you can make a ½ inch deep narrow slit across the drive or walk using a circular power saw and masonry blade. Place the wire in the slit and seal with outdoor silicone caulk of matching color. Use asphalt sealant for asphalt driveways.
PART 4 - TRAINING YOUR DOG Training your dog will require use of a separate restraining collar and short training lead. Do not use the RC-8 radio receiver collar as a restraining collar. Structure your training program to three, fifteen-minute sessions per day, EVERY DAY until your dog is fully trained. Stick to this program consistently but, do not train for more that fifteen minutes at a time or you risk losing your dog’s attention and the training becoming counter productive.
C. Repeat this stage for fifteen minutes, three times per day until there is no doubt that your dog has “Got it,” observing your dog’s resistance to entering the boundary field or trying to retreat before the stimulus is received. These are good signs. D. Observe your pet: Once you are certain that your pet will INSTINCTIVELY retreat at the first training tone, allow the animal to roam freely and observe his behavior. Make sure that you see him stop at the boundary flags on his own.
PART 5 – IMPORTANT CAUTION NOTICES Dogs are Unpredictable: Because individual dogs have unique temperaments, there is no way of knowing how your dog will react to its introduction to the training program. For your safety and your dog’s, initial training must take place using a training lead so that you keep complete control over the situation. Also realize that an aggressive animal could turn against the handler upon receiving the shock stimulus.
PART 6 – WARRANTY & CUSTOMER SUPPORT Your Humane Contain Model X-10 is the best made electronic fence you can buy and it’s covered by the best warranty. If anything goes wrong with your product within one year of purchase, you may return it to us for a free replacement. For customer support, where you can get product information, warranty support, tech support and order accessories, visit: www.hightechpet.
PART 7 – TROUBLESHOOTING PROCEDURES If any part of the system is not working use the following troubleshooting procedure to isolate the failed component. Then contact High Tech Pet Products Customer Support to get it repaired or replaced.
• If you have a friend who also owns a High Tech Pet Humane Contain system that is working, test your collar(s) on their operating system by holding your collar next to their collar in the yard. As you move both collars toward the wire loop both collars should beep at about the same rate. If this is true your collar(s) is working and your Base Station Transmitter has failed – repair or replace.
4) Repairing a Broken or Intermittent Containment Loop There are many ways to approach repairing a faulty loop depending on the length of wire, the number of connections, the terrain, available equipment, etc. Please call technical support at High Tech Pet Products for a list of methods. ACCESSORIES AVAILABLE AT WWW.HIGHTECHPET.COM Extra Collar: Model RX-10, Extra Radio Collar. Got extra dogs? You may add an unlimited number of extra collars to your X-10 system. Transmitter Back-up Battery: Model B12V-0.
2476 Palma Drive, Suite A Ventura, CA 93003 info@hightechpet.com See our complete line of ingenious pet products at www.hightechpet.com Humane Contain is a trademark of High Tech Pet Products, Inc. Manufactured in China Engineered in the USA! _________________________________________________________________________________ High Tech Pet Products, Inc. www.hightechpet.
High Tech Pet Products, Inc. 2476 Palma Drive, Suite A Ventura, CA 93003 www.hightechpet.com Rev.