
Roadster Orbital Head System User Manual

Roadster Orbital Head System User Manual 17
Chapter 3:
Operation and Maintenance
This chapter discusses the onboard menu system for the Orbital Head System. For more
information on operating the fixture with a controller, consult the controller documentation.
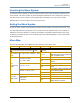
The Power Hub has an on-board menu system allows you to:
• Set a start channel
• Enable and disable default parameter settings
• View protocol type
• Crossload firmware
• Home the Mirror Head
• Test movement and sensor functions
• View current DMX values for all parameters
• View fixture number, software version, errors, channels needed, and next available DMX
channel.
• Strike and douse the projector lamp
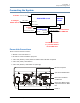
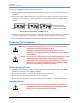
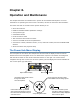
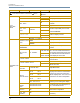
The Power Hub Menu Display
The front panel on the Power Hub component has a dot matrix display and six arrows on
buttons that control navigation for the on-board menu system. The buttons are configured
with the Menu button on the left and the Enter button on the right. The center button
navigates through the current level of menu options [Left and Right] and values available for
the current option [Up and Down].
Use the Menu button (on the left
when viewing the display) to unlock
the menu and move back to the pre-
vious menu level
Use the Enter button (on the
right when viewing the display)
to select the currently displayed
menu value or option.
Use left and right arrows to move
through the current
menu level options
Use up and down arrows to select
from available value or setting options.
4-way Navigation button
Menu system buttonsAlpha numeric display