
User's Manual


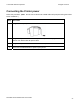
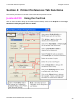

Table Of Contents
- DTC4500 User Guide
- Section 1: Specifications
- Section 2: Setup and Installation Procedures
- Section 3: Print Driver Installation
- Section 4: Printer Preferences Tab Functions
- |contextid=30 Using the Card tab
- Using the Toolbox Options
- |contextid=150 Using the Configuration Tab
- |contextid=151 Selecting the Calibrate Laminator tab
- Using the Event Monitoring Group Box
- |contextid=152 Selecting the Calibrate Ribbon tab
- |contextid=154 Selecting the Clean Printer tab
- |contextid=155 Selecting the Advanced Settings tab
- |contextid=40Using the Device Options tab
- |contextid=50Using the Image Color tab
- |contextid=51Using the Image Calibrate tab
- |contextid=70Using the Magnetic Encoding Tab
- |contextid=80Using the Lamination tab
- |contextid=90 Using the Overlay / Print Area tab
- |contextid=100Using the K Panel Resin tab
- |contextid=120Using the Printer Info tab
- Section 5: Selecting the Fluorescent Panel Ribbon Type
- Section 6: System Overview- Troubleshooting
- Section 7: Troubleshooting
- Section 8: Cleaning
- Section 9: Firmware Upgrades
- Section 10: HID Global Technical Support
- Appendix A

© 2010 HID Global Corporation All rights reserved
Connecting the Printer power
Follow this procedure. (Note: Do not connect the Printer’s USB cable until prompted during the Printer
Driver installation.)
Step Procedure
1 Plug the AC adapter power cable into the back of the Printer.
2 Plug the wall power cable into the AC power adapter. This display shows
Printer from behind with AC power cable.
3 Plug the wall power cable into a standard 110VAC power outlet.
4 Press the left ON/Off Button to power up the printer.
DTC4500 Card Printer/Encoder User Guide
27