
User's Manual
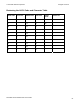
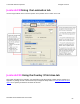
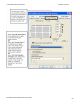
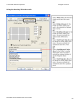
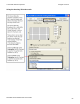
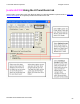
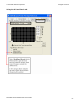
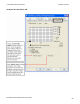
Table Of Contents
- DTC4500 User Guide
- Section 1: Specifications
- Section 2: Setup and Installation Procedures
- Section 3: Print Driver Installation
- Section 4: Printer Preferences Tab Functions
- |contextid=30 Using the Card tab
- Using the Toolbox Options
- |contextid=150 Using the Configuration Tab
- |contextid=151 Selecting the Calibrate Laminator tab
- Using the Event Monitoring Group Box
- |contextid=152 Selecting the Calibrate Ribbon tab
- |contextid=154 Selecting the Clean Printer tab
- |contextid=155 Selecting the Advanced Settings tab
- |contextid=40Using the Device Options tab
- |contextid=50Using the Image Color tab
- |contextid=51Using the Image Calibrate tab
- |contextid=70Using the Magnetic Encoding Tab
- |contextid=80Using the Lamination tab
- |contextid=90 Using the Overlay / Print Area tab
- |contextid=100Using the K Panel Resin tab
- |contextid=120Using the Printer Info tab
- Section 5: Selecting the Fluorescent Panel Ribbon Type
- Section 6: System Overview- Troubleshooting
- Section 7: Troubleshooting
- Section 8: Cleaning
- Section 9: Firmware Upgrades
- Section 10: HID Global Technical Support
- Appendix A

© 2010 HID Global Corporation All rights reserved
Section 5: Selecting the Fluorescent Panel Ribbon
Type
The YMCFKO/YMCFKOK Ribbon is an economical way to add a fully customizable, incremental level of
security to your photo identification cards.
• Process: This process allows you to configure the data that is printed with the fluorescent panel of
an YMCFKO/YMCFKOK Ribbon. (Note: Any software program may be used to print the special
florescent panel of the Ribbon to a card once the Driver and Workbench are set up correctly.)
• Ribbons: These Ribbons contain a yellow (Y), magenta (M), cyan (C), and resin black (K) panels to
create a full color over-the-edge printing identification card. In addition, the Ribbon contains a dye-
based fluorescing panel (F) which will allow you to print a standard or one-to-one personalized
grayscale fluorescing image that is completely invisible until exposed to ultraviolet light.
Creating a Custom Fluorescent Image (using the YMCFKO Ribbon)
There are three (3) methods used to accomplish the creation of a custom fluorescent image when using
the YMCFKO Ribbon.
• First Method: The first method uses the Fargo Workbench Printer Utility to create a static image that
will be applied automatically to each card sent to the Printer. Refer to the Help file for the Fargo
Workbench Utility Program and User Guide or to Appendix A for Configuring Fluorescent Data
(F-Panel for YMCFKO Ribbon) using the Workbench.
• Second Method: The second method (described below) allows the creation of the fluorescent panel
image directly from the badge application software. (Note: You can now print a unique fluorescent
image, such as the card holder’s picture on each card.)
• Third Method: The third method is described in the Asure ID 2009 Software User Guide. See the
procedure relating to the Fluorescent Panel Ribbon. For more information about Asure ID 2009,
please visit our website at http://www.hidglobal.com/cardIssuance/idSoftware.php
DTC4500 Card Printer/Encoder User Guide
70