
User's Guide


3 Setup and Installation
3.1 Selecting a good location
The following guidelines help to ensure optimal printing performance:
▪ Place the unit in a location with adequate air circulation and ventilation to prevent ink fume and
internal heat buildup.
▪ Use the dimensions of the printer as a guideline for the minimum clearances to the unit.
▪ Provide a table or bench for the unit which is flat and stable to prevent vibration.
▪ Allow for adequate clearance above and behind the unit to accommodate the unit with its
covers open. You will need access to the back of the unit to install module interface cables.
▪ Do not install this unit in an environment with acidic vapor. This could cause ink hardening on
or in the head, resulting in poor print quality and missing nozzles.
▪ Do not install the unit near heat sources such as radiators.
3.2 Moisture condensation
If the unit is brought directly from a cold to a warm location or is placed in a very damp room, moisture
may
condense inside the unit. Should this occur, if ink is added to the machine, there may be a chemical
reaction between the water and ink, potentially causing clogging of the printhead nozzles.
Leave the unit unplugged in a warm, dry room for several hours before using to allow any moisture to
evaporate.
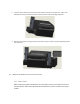
3.3 Unpacking and Inspection
While unpacking the printer, inspect the carton to ensure that damage did not occur during shipping.
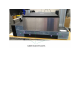
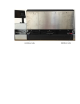
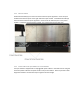
The printer includes 3 modules (Prime Input Module, Print Module, and Output Module), each of which
are shipped in a separate box.
Caution: Lifting the print module must be done by 2 people.
Make sure that all supplied accessories are included with the unit: