
User's Manual


ENTRYPROX – 4045-907 REV A
6
MOUNTING THE ENTRYPROX UNIT
If you mount the EntryProx unit to a wall, you can install an
electrical junction box to hold the unit and the wires in place.
The mounting hole cutouts on the backplate line up with the
screw holes on a standard junction box.
If you mount the EntryProx unit to a glass surface DO NOT
remove the wire exits on the backplate. Remove the
appropriate wire exit cutouts located on each side of the
controller keypad case.
PRECAUTIONS FOR OUTDOOR INSTALLATIONS
Water damage is a key cause of unit malfunction, causing
corrosion or short circuits. When mounting the unit in an
area that will be exposed to rain or moisture, take the
following precautionary measures:
1. Use silicone to seal wire runs and mounting holes
(antenna is already sealed).
2. Do NOT seal the cover and base together. Water
that enters the case must be allowed to run out at the
bottom.
3. Bend the wires to form a drip loop before they
enter the case. This will prevent water from following
the wires into the case.
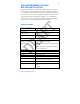
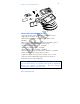
BEGINNING ENTRYPROX INSTALLATION
To mount the EntryProx unit, refer to Figures 2 and 3 and
follow these instructions:
1. Remove the hex screw located at the bottom of the
EntryProx unit.
2. Disconnect the backplate of the EntryProx unit
from the controller keypad.
If your installation must comply with the UL 294 Standard
for Access Control, please read Page 14.