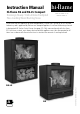
Instruction Manual Hi-Flame R6 and R6-LS Compact Ecodesign Ready / Defra Smoke Exempted Free-standing Wood Burning Stove hi-flame O U T S TA N D I N G W O O D B U R N I N G S TO V E S w w w. h i - f l a m e . c o . u k w w w. h i - f l a m e . i e Please note that this appliance has been independently CE and DIN+ tested by an EU Notified Laboratory and is approved by Defra as an ‘exempted appliance’ to allow the burning of wood in designated UK Smoke Control Areas (see page 16).
IMPORTANT: USER WARNING NOTES Properly installed, operated and maintained this stove should NOT emit smoke or fumes into the dwelling. Occasionally fumes from refuelling may occur. However, persistent smoke or fume emission is potentially dangerous and must not be tolerated. If this persists, then the following immediate action should be taken: If the CO alarm (which should be fitted at the time of installation) sounds, please follow the advice above.
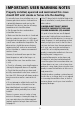
CONTENTS R6/ R6-LS PRODUCT VERIFICATIONS Page 3 Product Verifications 4 Introduction 4 Installer Safety First 5 Product Fiche 6 ErP Energy Label 7 Technical Data 8 Critical Safe Distances 9 General Dimensions – R6 Model 10 General Dimensions – R6-LS Model 11 Standard Features 12 Packing List and Assemby Instrucions 13 Installation Regulations 13 Further Information Points 14 Basic Installation Check-list 15 – 16 General Installation Guidelines 17 Clean Air Act & Smoke Control Areas 18 Recommended Fuel 19 F
INTRODUCTION wear protective gloves and use the tool supplied when adjusting the stove’s air control. Thank-you for purchasing this new Hi-Flame Ecodesign wood burning stove. We are confident that with its state-of-the-art combustion technology and ultra-low emissions it will not only provide you with highly efficient carbon neutral heat but also give you very many years of pleasure at it takes centre stage in your home. Asbestos This stove does not contain Asbestos.
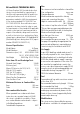
hi-flame ECODESIGN REGULATIONS PRODUCT FICHE EU Commission Delegated Regulation 65 / 2014 O U T S TA N D I N G W O O D B U R N I N G S TO V E S w w w. h i - f l a m e . c o . u k w w w. h i - f l a m e . i e Trademark Hi-Flame Product Name & Model Number Hi-Flame R6 / R6-LS Product Description Solid Fuel Roomheater (Wood) CE EN Standard Type Test EN 13240:2001 + Amd 2:2004 EU Notified Test Body / Number SGS Nederland BV Notified Body 0608 Nominal Heat Output 5.8 kW Nominal Net Efficiency 77.
ERP LABEL 6
R6 and R6-LS TECHNICAL DATA Flue Hi-Flame Fireplace (UK) Limited declare that the test stove submitted for type testing of the R6 model represented the full production model specifications in all critical technical parameters needed to fulfil the requirements of the testing standard EN 13240:2001 an EN 13240-A2:2004. No modifications were required to the items tested in order to meet the requirements of the standard.
CRITICAL SAFE DISTANCES Fireplace Openings When this stove is installed within a fireplace opening the appropriate air space must be provided to ensure the free movement of the radiated heat and hot air. If this is restricted it could affect the stove’s safe and efficient operation as well as shorten the lifespan of the stove components and, in particular, the vermiculite insulating panels and baffle plate.
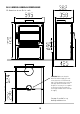
R6 MODEL GENERAL DIMENSIONS All dimensions in mm. Check critical dimensions on site. WARNING When not using the Direct External Air Supply you must ensure that there is a minimum air gap of 35mm between the end of the inlet pipe and the back wall of the fireplace. If necessary, it is acceptable to trim the air inlet to provide the 35mm gap that will ensure an ample air supply.
R6-LS MODEL GENERAL DIMENSIONS All dimensions in mm. Not to scale. WARNING When not using the Direct External Air Supply you must ensure that there is a minimum air gap of 35mm between the end of the inlet pipe and the back wall of the fireplace. If necessary, it is acceptable to trim the air inlet to provide the 35mm gap that will ensure an ample air supply.
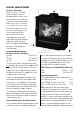
R6 STANDARD FEATURES combustion air just as the flue gas is about to leave through the flueway this ensures even more unwanted particulates are burned off helping to keep emissions to a minimum. 1 Combustion Air Control For ease of use, there is only one combustion air control on the R6 wood burner.
PACKING LIST Check that you have a full set of components shown in the list below. Some components may be contained inside the firechamber. In the unlikely event of a shortage, please report this immediately to your stove dealer. Never attempt to operate the stove with missing or damaged components.
INSTALLATION REGULATIONS monitor continuous improvement in the safe installation and use of stoves. www.hetas.co.uk This stove must be installed by a recognised competent person who is appropriately qualified to ensure that the installation complies with all local, national and European Building Regulations. Failure to comply with this may invalidate the Hi-Flame Warranty. We therefore strongly recommend using a Hetas Registered Installer (www.hetas.co.uk).
BASIC INSTALLATION CHECK-LIST BS EN 15287-1:2007 Design, installation and commissioning of chimneys. This information is intended to outline the general principles of installing your stove. However, as each installation will vary it is unfortunately not possible for these guidelines to be comprehensive. NB The minimum flue height required for this stove is 4.5 metres (15’).
GENERAL INSTALLATION GUIDELINES distances when this stove is located inside a fireplace – see pages 7 and 8. Please note if the fireplace interior needs to be lined you must not use standard plasterboard as this is combustible. Any sheet materials, the supports used behind it and fitting components should have the maximum possible fire rating.
an installation where the finished flue height would be less than 4.5 metres. Failure to satisfy this requirement could result in the installation failing the commissioning and spillage tests outlined elsewhere in this handbook (see pages 35 to 38) as well as invalidate your extended Hi-Flame Warranty. particularly if they are made of old or porous brick and / or are jointed with lime mortar, eventually causing unsightly stains on decorative coverings. • Stoves work best with the correct draught.
THE CLEAN AIR ACT 1993 AND SMOKE CONTROL AREAS ensure the correct quantity of combustion air is always delivered to keep smoke to a minimum and therefore both models have been recommended by Defra as suitable for use in Smoke Control Areas when burning wood logs. Under the Clean Air Act local authorities may declare the whole or part of the district of the authority to be a Smoke Control Area.
RECOMMENDED FUEL Oak and Elm can be used. However, avoid woods with a high resin content. As a rule of thumb, the heavier the wood, then the greater the heat output and the longer burn time – the time between refills. All of this is providing it is fully seasoned wood. Wood logs with a moisture content of less than 20% is the only fuel that Hi-Flame recommend for burning in this stove.
FUELS YOU MUST ALWAYS AVOID WHEN YOU FIRST LIGHT YOUR STOVE This wood burning stove has been emissions tested so that when correctly operated it will have a minimum impact on local air quality when only burning wood logs with a moisture content of less than 20%. It has not been tested for burning mineral fuels including smokeless coal. Burning other fuels, apart from logs, is an offence in a Smoke Control Area.
ESSENTIAL SAFETY ADVICE • For your safety make sure that your stove’s installation complies with all local Building Regulations’ ventilation requirements. Low energy houses have particular requirements and these should be strictly adhered to. • Ensure that an approved carbon monoxide (CO) detector (BS EN50291:2001) is fitted in the same room as the stove and is regularly tested.
THE BETTER WAY TO BURN WOOD which could cause ash or small lighted embers to be drawn from the firechamber and beyond the protective hearth. Never operate the stove without the fire fence being in place. Wood takes its combustion air from above the firebed and will always burn best on a bed of embers (approx 25mm deep).
OPERATING YOUR STOVE Refuelling Logs (C) These should be approximately 75 to 100mm across. Thicker logs should ideally be split down to this size. General principles When lighting your stove you will need to get the temperature in the firechamber as high as possible as quickly as possible. This is critical in creating a good updraught or ‘draw’ within the flue system, especially when it is particularly cold outside.
until it can be closed without significantly affecting how well the kindling is burning. After about six or seven minutes you can then add some wood... temperature than loosely criss-crossed logs. Approximately 0.50kg of logs (one or two) can be added at this stage. Be careful not to add too many logs as they may ‘smother’ the fire. Avoid setting the ends of the logs pointing towards the glass as this can cause staining which the airwash may not remove. Always load on to a bed of hot embers.
open the air control (slide right). This will make any remaining embers glow red which will help the new logs to start burning quickly when they are added. Rake the embers and spread them out to make an even bed. You may need to add some kindling to re-establish the fire. Add the new wood as discussed before ensuring that the logs are not tightly packed. embers will create excess smoke and will take much longer.
SOME SIMPLE TIPS REMOVING ASH 1 When refuelling use small regular loads as this will produce a more efficient and cleaner burning performance. As a wood burning-only stove this stove does not feature a removable ash pan or riddling grate. This is because fully seasoned wood, which has been efficiently burned in a stove, will produce very little ash. In addition, you do not need to clear the firebed very often, but allow the ash to build up to a depth between 25 to 30mm.
TROUBLE-SHOOTING Do not re-light the stove again until the flue system has been thoroughly inspected by an approved installer or chimney sweep and any necessary repairs have been carried out. These pages should be your first reference point if you experience any problems with the operation of your stove. Only contact your stove installer or dealer after you’ve read the advice here and if you still cannot resolve your particular issue.
2 The stove or flue pipe glow red with excessive heat surfaces, but these should eventually pass as the paint cures after four or five firings. Occasional minor smoke escape may also occur during lighting and refuelling depending on particular weather conditions. When a stove has not been used for some time fumes may also occur due to any condensation build-up within the chimney drying off. This situation could potentially cause a house fire and / or damage the stove.
do regarding the safe operation of your stove. Burning wet wood causes the incomplete combustion of the fuel and lowers the firechamber temperature and flue pressure so that creosote residue and heavy soot deposits are left inside the flueway and chimney. These will eventually, and usually very quickly, cause a blockage making it harder for the smoke (and CO) to take its normal safe route through the flue system so that it escapes from the stove and consequently enters the room.
Likely causes and how to avoid them Poor heat output is more than likely caused by poor fuel, such as ‘green’, unseasoned or wet wood. We cannot over-estimate how critical it is to use fully seasoned dry wood with a moisture content of less than 20%. points on all four sides between the door and firechamber front and checking that when the door is closed the paper is gripped.
vigorous flame, it is then hard to control the flame and extend the life of the logs because there are simply not enough calories of heat left within the remaining fuel to extend the burn cycle as well as deliver sufficient heat. an acrid odour then this indicates the use of unseasoned or wet wood (see page 32).
ROUTINE CHECKS Avoid continuous low burning Continuously burning your stove with a very low flame, such as slow overnight burning will also cause the glass to get dirty because the airwash does not get hot enough and therefore some blackening of the glass should be considered a ‘trade-off’.
STOVE MAINTENANCE fired this can be quite a dirty job so protective gloves, face mask and goggles should be worn and in addition any porous hearth surfaces and floor coverings should also be protected. Baffle Plates and Flueway During the heating season check the flueway and the double baffle plates at least once a month to start with and remove any soot deposits. Should these be excessive then have your chimney and flue cleaned.
mallet to gently tap it free. Check the baffle for wear and use a soft wire brush to remove any soot deposits from both the baffle and around the flueway. If the baffle needs replacing a genuine replacement can be obtained from your authorised Hi-Flame dealer or from www.hi-flame.co.uk. Please note in line with all stove manufacturers vermiculite panels, baffle plates and other internal components are regarded as consumable items and are therefore not covered under your Hi-Flame Warranty.
the screws prove difficult to remove. Be careful not to dislodge the ribbon seal. If this is damaged or more than a year old then always replace it completely. The resilience of a new seal will provide a much-needed expansion gap between the cast door and the glass clamp to help prevent the glass from cracking as it expands. New ribbon seal can be held in place with rope seal glue which will be available from your dealer.
THE DIRECT EXTERNAL AIR SUPPLY (DEAS) Ref BS8303 (2018) importance of regularly testing it. • The householder should also be made aware that the stove should never be operated with the door open except when refuelling and this should always be kept to a minimum.
SPILLAGE AND FLUE INTERFERENCE TESTS Ref BS8303 (2018) improvement in the flue draught is generated. Again, light a smoke pellet and place inside the stove firechamber and close the stove door. Flue pressure requirements The minimum recommended flue pressure for this stove is 12Pa. Provided the flue pressure reading is within the 12Pa to 18Pa range then the stove should operate satisfactorily – subject to any spillage test outcomes.
pass over the top and sides of the firechamber opening and observe and record if the smoke / combustion products are drawn into the chimney or spill back into the room. Once the smoke match / pen is extinguished, close the appliance door. 2 Close all external doors and windows, as well as the internal doors to the room the stove is located in and ensure all closable ventilators (eg window trickle vents) are closed and any devices that extract air from the dwelling are turned off.
COMMISSIONING 11 Confirm that the Warranty Registration has been completed for UK installations at www.hi-flame.co.uk/pages/warranty-registration, and for Republic of Ireland installations at www.hi-flame.ie/pages/warranty-registration. Ensure the contact details and registration number of the Hetas / INFO installer or recognised competent person who carried out the installation is included. In Northern Ireland you will have to supply details of Building Control approval for the installation works.
STANDING DOWN HI-FLAME WARRANTY At some point in the year you will not need to use your stove and taking care to clean it thoroughly then will save you much time and effort later. This is also a good time to have your chimney swept to prevent any soot deposits falling into the stove and potentially blocking the flueway. Your new Hi-Flame stove has been CE EN13240 tested in Europe to ensure that it meets UK and Irish constructional performance, emissions and safety standards.
ANNUAL SERVICE Thoroughly clean the stove glass on both sides. Check that the door seal continues to make an air-tight seal and replace if necessary. Ensure that the new rope joint is also in the middle at the base of the rope seal channel. Replacement rope should be 12mm diameter. See pages 33 and 34. In the interests of safety and efficient performance it is important that your stove is serviced on an annual basis in accordance with the instructions outlined below.
FIRST SERVICE Date Additional work carried out: Next Service Due Signed Print Dealer’s Stamp or HETAS Registration Number SECOND SERVICE Date Additional work carried out: Next Service Due Signed Print Dealer’s Stamp or HETAS Registration Number THIRD SERVICE Date Additional work carried out: Next Service Due Signed Print Dealer’s Stamp or HETAS Registration Number FOURTH SERVICE Date Additional work carried out: Next Service Due Signed Print Dealer’s Stamp or HETAS Registration Number FI
SIXTH SERVICE Date Additional work carried out: Next Service Due Signed Print Dealer’s Stamp or HETAS Registration Number SEVENTH SERVICE Date Additional work carried out: Next Service Due Signed Print Dealer’s Stamp or HETAS Registration Number EIGHTH SERVICE Date Additional work carried out: Next Service Due Signed Print Dealer’s Stamp or HETAS Registration Number NINTH SERVICE Date Additional work carried out: Next Service Due Signed Print Dealer’s Stamp or HETAS Registration Number T
NOTES Installation Date Purchase Date Serial Number (from bar code label / packaging) Stove Dealer’s Contact Details Stove Installer’s Contact Details Notes eg Chimney Sweep / Log Supplier contact details etc 43
hi-flame O U T S TA N D I N G W O O D B U R N I N G S TO V E S w w w. h i - f l a m e . c o . u k w w w. h i - f l a m e . i e HI-FLAME SPARES SERVICE In the interests of safety, only use genuine Hi-Flame replacement components. Once you have identified the component you need you can order it from your authorised Hi-Flame dealer or at www.hi-flame.co.uk or if you’re in the Republic of Ireland www.hi-flame.ie.