
Operating Instructions

INITIAL INSTALLATION
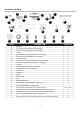
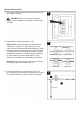
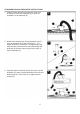
4.
Loosen all four mounting brackets screws (W),
then completely remove the two mounting bracket
screws (W) from the round holes of canopy (D). Set
aside for later use.
Detach mounting bracket (E) from canopy (D).
Note: Do NOT remove the mounting bracket screws
(W) from the slotted holes.
4
E
W
D
5.
Extend the supply wires from outlet box (not
included) to one side of the mounting bracket (E)
and secure the mounting bracket (E) to the outlet
box using screws and washers provided with the
outlet box.
CAUTION: It is very important you use the proper
hardware when installing the mounting bracket (E) as
this will support the fan.
Note: Do not feed supply wires through the hole in the
top of the mounting bracket.
Important: If using the angle mount, ensure the open
end of the mounting bracket (E) is installed facing the
5
E
Standard or
Closemount
Mounting
E
higher point of the ceiling.
Angled
Mounting
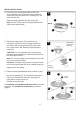
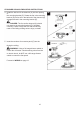
6.
Remove all ten preassembled motor screws (U) and
the motor assembly (G). Then install the blade arms
(N) into the underside of the motor assembly (G)
using the ten motor screws (U).
Discard the motor blocks.
6
U
Motor
Block
For Standard or Angle Mounting Instructions, continue
to page 9. For Closemount Instructions, proceed to
page 11.
G
U
N
G
8