OWNER’S MANUAL MicroTPI & MicroTPW Field Portable Turbidimeters HF scientific, inc. 3170 Metro Parkway Ft. Myers, FL 33916 Phone: 239-337-2116 Fax: 239-332-7643 Toll free: 888-203-7248 Email: HFinfo@Watts.com Website: www.hfscientific.com Manual Part No. 24378 (5/10) Rev. 1.
DECLARATION OF CONFORMITY Application of Council Directive Standard to which Conformity is Declared: Product Safety - Tested and passed CE EN61010-1:1990 + A1:1992 (73/32 EEC) Immunity and Emissions – Tested and passed EN61326-1: 2006 Manufacturer’s Name: HF scientific, inc.
Table of Contents DECLARATION OF CONFORMITY............................................................................................ i Specifications ................................................................................................................................. 1 1.0 Overview ............................................................................................................................ 2 1.1 Unpacking and Inspection of the Instrument and Accessories ........................
Specifications Measurement Range 0.01 –1100 NTU/FNU Accuracy ±2% of reading or 0.01 NTU (0-500 NTU) ±3% of reading (500-1100 NTU) Resolution 0.01 NTU below 100.0 NTU, 0.1 NTU for 100.0 NTU – 999.9 1.0 NTU for 1000 to 1100 NTU Regulatory Compliance MicroTPI IR (860 nm) LED Compliant to ISO 7027 MicroTPW Tungsten Lamp Compliant to U.S. EPA 180.
1.0 Overview The MicroTPI/TPW allows for the measurement of turbidity in the field. The MicroTPI was designed to meet the design criteria specified in ISO 7027 and DIN 27027 for the measurement of the turbidity of a sample. The MicroTPW was designed to meet the criteria specified in USEPA 180.1 on turbidity measurement. 1.1 Unpacking and Inspection of the Instrument and Accessories The table below indicates items included in the turbidimeter shipment.
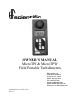
Figure 1 is a depiction of the top of the instrument. The three main components of the instrument are the sample well, the display, and the touch pad. The following sections will describe the functionality of the display and the touch pad. The proper use of the instrument and the sample well will be discussed in later sections. Figure 1: Top view of the instrument (MicroTPW shown). 1.2 The Display All of the items that can appear on the display are shown in Figure 2.
1.3 The Touch Pad The touch pad has five buttons: ON/OFF, CAL, ↵, t, and u. The ON/OFF button is used to turn the instrument on and off. The CAL button is used to enter or exit calibration. The ↵ button, when pressed and held can be used to index the current sample, when the button is released it starts a reading or calibration. The tand u buttons are used to change the calibration points. 2.0 Safety This manual contains basic instructions for the operation, care and maintenance of the instrument.
3.0 Normal Operation This instrument allows for the measurement of the turbidity of a grab sample. The turbidity is reported in Nephelometric Turbidity Units (NTU) and Formazin Nephelometric Units (FNU). Readings above 1100 NTU are outside the range of this instrument. Note: Nephelometric turbidity units (NTU’s) are numerically equivalent to Formazin nephelometric units (FNU’s) (See Glossary). Below are some typical screens and a description of when you should see them.
3.1 Routine Measurement Turn on the instrument by pressing the ON/OFF button for 1 second. The following are the recommended steps to take a reading: 1. Sample approximately 100 mL of the process. 2. Obtain a clean and dry sample cuvette. 3. Rinse the cuvette with approximately 10 mL of the sample water (2/3 of cuvette volume), capping the cuvette with the black light shield (cuvette top) and inverting several times. Discard the used sample and repeat the rinsing procedure two more times. 4.
4.0 Instrument Calibration The instrument was calibrated and tested prior to leaving the factory. Therefore, it is possible to use the instrument directly out of the box. However, re-calibration of the instrument is recommended to help with familiarization and the operation of the instrument and the calibration procedures. In addition, re-calibration is recommended at least once every three months. The instrument requires three (3) standards to be fully calibrated.
4.3 Calibration Procedures The following procedure is recommended to perform a full range calibration. Ensure that the calibration standards have been indexed prior to proceeding. 1. Select the calibration function of the instrument by pressing the CAL button once. The “CAL” icon will be illuminated on the display with “1000” flashing indicating the standard required for this step of the calibration. 2.
8. Insert the 0.02 NTU standard into the sample well and press down until the cuvette snaps fully into the instrument. Align the indexing ring with the arrow on the instrument (see section 4.2 if the standard is not already indexed). 9. Press and hold the ↵ button while making fine adjustments to the indexing. Release the button to initiate the calibration. The display will now show a 30 second count down 10. When the instrument has completed the calibration on the 0.
5.0 Routine Maintenance If the instrument is not kept in the supplied carrying case, when not in use, ensure that the instrument has been turned off and that a clean sample cuvette fitted with a black cap has been placed in the sample well. This will ensure that a minimal amount of dust and/or debris will be able to settle on the optics of the instrument 5.
5.2 Battery Replacement The instrument will periodically require new batteries to function properly. This will be indicated with a battery icon on the display. To replace the batteries: 1. Turn the instrument off and place it upside down on a soft surface. 2. Remove the two screws (A) securing the battery cover (B). Lift cover off. 3. Remove the old batteries. Place four new AAA batteries (C) into the battery compartment (ensuring the correct polarity). 4.
6.0 Troubleshooting The instrument routinely performs self-diagnostics, and will automatically generate messages to provide specific diagnostic information. 6.1 System Warning Messages Automatic warning messages are generated to provide specific diagnostic information about the instrument. These messages are for the operator’s use and do not indicate a reduction in the performance of the instrument or a failure of any component in the instrument. 6.
6.3 System Error Messages Normally, the cause of an error message is external to the instrument. If an error is identified the instrument will turn on the error icon (ERR) . The following table lists the error messages and their associated meanings: ERROR SOLUTION Err Icon on Internal Error contact HF scientific Technical Service Dept. Err Icon on Bad standards or standards in wrong order see section 4.4 for more information Display reads CAL 6.
7.0 Accessories and Replacement Parts List The items shown below are recommended accessories and replacement parts for the instrument. Accessory Catalog Number ProCal Calibration Set for normal operation (includes 0.02 NTU, 39845 10.0 NTU and 1000 NTU Standards). Turbidity Free Water, 4 Liters (1gal.
8.0 Warranty The manufacturer warrants to the original purchaser of this instrument that it will be free of defects in material and workmanship, in normal use and service, for a period of one year from date of delivery to the original purchaser. The manufacturer’s obligation under this warranty is limited to replacing, at its factory, the instrument or any part thereof.
9.0 Glossary Formazin Nephelometric Units (FNU): Equivalent in value to Nephelometric Turbidity Units (NTU) Formazin Turbidity Units (FTU): Equivalent in value to Nephelometric Turbidity Units (NTU) Indexing a Cuvette: The United States Environmental Protection Agency (US EPA) recommends that cuvettes, used for turbidimeter calibration or sample measurement, be indexed. To index a cuvette with a sample in it, slowly rotate the cuvette throughout one complete revolution (360°).