
User Manual
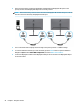


Table Of Contents
- Getting started
- Using the monitor
- Downloading software and utilities
- The Information file
- The Image Color Matching file
- Using the OSD menu
- Customizing the monitor
- Changing the Power Mode setting
- Using Auto-Sleep Mode
- Using PIP and PbP
- Using low blue light mode
- Adjusting blue light output
- DisplayPort multistreaming over USB Type-C or DisplayPort
- Support and troubleshooting
- Maintaining the monitor
- Technical specifications
- Accessibility

2. Add a second monitor by connecting a DisplayPort cable between the DisplayPort OUT port on the
primary monitor and the DisplayPort IN port on a secondary monitor.
NOTE: All but the last daisy-chained monitor need to have DisplayPort IN and OUT video ports. The last
monitor in the chain needs only a DisplayPort IN video port.
3. Set a connected monitor to display the same image as the primary monitor or a dierent image.
4. To connect additional monitors (up to four maximum), press the Menu button to open the OSD menu.
Navigate to Input and then USB-C MST Conguration, and select USB-C Video+USB 2.0.
5. Connect the DisplayPort cable from the DisplayPort OUT port of one monitor to the DisplayPort IN port
of the next monitor.
24 Chapter 2 Using the monitor