
User Manual
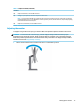


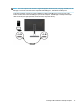
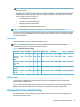

Table Of Contents
- Getting started
- Using the monitor
- Downloading software and utilities
- The Information file
- The Image Color Matching file
- Using the OSD menu
- Customizing the monitor
- Changing the Power Mode setting
- Using Auto-Sleep Mode
- Using PIP and PbP
- Using low blue light mode
- Adjusting blue light output
- DisplayPort multistreaming over USB Type-C or DisplayPort
- Support and troubleshooting
- Maintaining the monitor
- Technical specifications
- Accessibility

Table 1-4 USB port locations (continued)
USB Ports
(2) USB port: downstream, connects USB accessories
(3) USB Type-C port: upstream, connects to computer or source device
NOTE: You must connect the USB Type-C cable from the source device (computer) to the rear of the monitor to enable the
downstream USB ports to serve as a USB hub for a mouse, keyboards, phones, external hard drives, and practically anything
that is USB-connected and can accept 5 V.
(4) USB ports (2): downstream, connects USB accessories
Adjusting the monitor
To support an ergonomic work space, your monitor oers the adjustment options outlined in this section.
WARNING! To reduce the risk of serious injury, read the Safety & Comfort Guide. It describes proper
workstation setup and proper posture, health, and work habits for computer users. The Safety & Comfort
Guide also provides important electrical and mechanical safety information. The Safety & Comfort Guide is
available on the web at http://www.hp.com/ergo.
1. Tilt the monitor head forward or backward to set it to a comfortable eye level.
Setting up the monitor 13