
User Manual
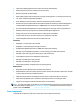


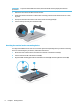


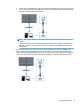
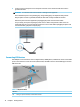
Table Of Contents
- Getting started
- Using the monitor
- Downloading software and utilities
- The Information file
- The Image Color Matching file
- Using the OSD menu
- Customizing the monitor
- Changing the Power Mode setting
- Using Auto-Sleep Mode
- Using PIP and PbP
- Using low blue light mode
- Adjusting blue light output
- DisplayPort multistreaming over USB Type-C or DisplayPort
- Support and troubleshooting
- Maintaining the monitor
- Technical specifications
- Accessibility

IMPORTANT: To position and stabilize the monitor, HP recommends that two people perform these
procedures.
1. Disconnect and remove all cables from the monitor.
2. Position the monitor facedown on a at surface covered by protective sheet made of foam or a clean,
dry cloth.
3. Push up the latch near the bottom center of the stand’s mounting plate (1).
4. Lift the stand up and away from the monitor (2).
Attaching the monitor head to a mounting device
You might need additional tools such as a screwdriver (purchased separately) when you attach a mounting
device. To avoid damage to your monitor, follow these instructions.
1. Remove the two screws from the stand mount on the back of the monitor head (1).
2. Lift the stand mount o of the monitor head (2).
3. Align the VESA mounting plate with the two VESA screw holes (3), and then tighten the screws (4).
8 Chapter 1 Getting started