
User Manual
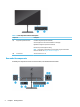
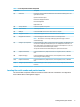


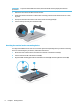


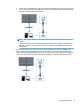
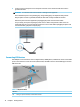
Table Of Contents
- Getting started
- Using the monitor
- Downloading software and utilities
- The Information file
- The Image Color Matching file
- Using the OSD menu
- Customizing the monitor
- Changing the Power Mode setting
- Using Auto-Sleep Mode
- Using PIP and PbP
- Using low blue light mode
- Adjusting blue light output
- DisplayPort multistreaming over USB Type-C or DisplayPort
- Support and troubleshooting
- Maintaining the monitor
- Technical specifications
- Accessibility

2. Attach the stand to the connector on the back of the monitor.
The latch on the stand clicks when the stand is locked in place.
3. Attach the base to the stand (1), and tighten the screw (2).
Mounting the monitor head
To attach your monitor to a wall using a swing arm or other mounting xture, follow the steps in this section
to safely and securely connect your monitor.
IMPORTANT: This monitor supports the VESA industry-standard 100 mm mounting holes. To attach a third-
party mounting solution to the monitor head, use four 4 mm, 0.7 pitch, and 10 mm long screws. Longer
screws might damage the monitor. Be sure that the manufacturer’s mounting solution is compliant with the
VESA standard and is rated to support the weight of the monitor head. For best performance, use the power
and video cables provided with the monitor.
NOTE: This apparatus is intended to be supported by a UL-listed or CSA-listed wall-mount bracket.
Removing the monitor stand
If you decide to use a wall mount instead of the monitor stand that you attached, rst remove the stand.
IMPORTANT: Before you disassemble the monitor, be sure that the monitor is turned o and all cables are
disconnected.
Setting up the monitor 7