
User Manual
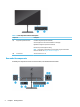
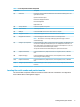


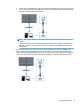
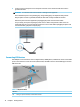
Table Of Contents
- Getting started
- Using the monitor
- Downloading software and utilities
- The Information file
- The Image Color Matching file
- Using the OSD menu
- Customizing the monitor
- Changing the Power Mode setting
- Using Auto-Sleep Mode
- Using PIP and PbP
- Using low blue light mode
- Adjusting blue light output
- DisplayPort multistreaming over USB Type-C or DisplayPort
- Support and troubleshooting
- Maintaining the monitor
- Technical specifications
- Accessibility

Table 1-3 Rear components and their descriptions
Component Description
(1) OSD control Pressing the center activates the OSD buttons so that the button labels appear on the
right side of the screen.
Up button: Next Active Input
Down button: Display Information
Left button: Brightness
Right button: Color
(2) Security cable slot Connects an optional security cable.
(3) Power connector Connects a power cord.
(4) HDMI port Connects the HDMI cable to a source device such as a computer.
(5) DisplayPort connector Connects the DisplayPort cable to a source device such as a computer.
(6) DisplayPort Out connector Connects a DisplayPort cable from the monitor to a secondary monitor.
NOTE: This connector is covered by a rubber plug. Remove the plug to connect a
downstream display.
(7) USB Type-C port (upstream) Connects a USB Type-C cable to a source device such as a computer. This USB Type-C port
can function as a DisplayPort audio/video input or as a USB upstream connection, or it
can be used to deliver up to 100 W of power to a device. Power outputs are 5 V, 9 V, 12 V,
15 V, and 20 V with a total maximum output of 100 W.
This port also enables the downstream USB ports to perform their functions.
(8) USB port (downstream) Connects a USB cable to a peripheral device such as a keyboard, mouse, or USB hard
drive.
(9) USB port (charging) Connects a USB cable to a peripheral device, such as a keyboard, mouse, or USB hard
drive and supports battery charging.
(10) USB port (downstream) Connects a USB cable to a peripheral device, such as a keyboard, mouse, or USB hard
drive.
(11) USB Type-C port (downstream) Connects a USB Type-C cable to a peripheral device, such as a keyboard, mouse, or USB
hard drive.
Locating the serial number and product number
The serial number and product number are located on a label on the rear of the monitor. You might need
these numbers when contacting HP for support.
Getting to know your monitor 5