
Installation and Instruction Manual

23
D. Condenser
Check the condenser once a year, and clean if required by following the steps below.
More frequent cleaning may be required depending on location.
WARNING
• Move the control switch to the "OFF" position and unplug the ice machine from
the electrical outlet before cleaning the condenser.
• To reduce the risk of electric shock, do not touch the control switch or plug with
damp hands.
• Condenser ns are sharp. Use care when cleaning.
1) Move the control switch to the "OFF" position and unplug the ice machine from the
electrical outlet.
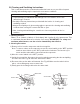
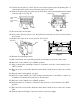
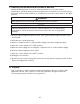
2) Remove the 2 screws securing the front
panel, then remove the panel. See Fig. 48.
3) Remove the 2 screws securing the louver,
then remove the louver.
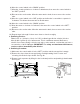
4) Use a brush attachment on a vacuum
cleaner to gently clean the condenser ns.
Do not use too much force, otherwise the
ns could be damaged.
5) Replace the louver and front panel in their
correct positions. Ensure that the screws
are securely in place.
6) Plug the ice machine back in. Move the control switch to the "ICE" position to start the
automatic icemaking process.
E. Optional Drain Pump AGDP
If the optional drain pump (AGDP) is installed, test its operation at least once a year as
outlined below. Note that the pump has power even when the control switch is in the
"OFF" position.
NOTICE
If the optional drain pump is not operating properly, it will adversely affect
performance, component life, and warranty coverage and may result in costly water
damage.
1) Move the control switch to the "OFF" position, then unplug the ice machine from the
electrical outlet. WARNING! To reduce the risk of electric shock, do not touch the
control switch or plug with damp hands.
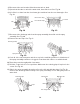
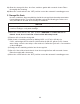
2) Remove all ice from the storage bin.
3) Plug the ice machine back in.
4) Slowly pour 24 to 30 oz. (710 to 890 ml) of water over the storage bin drain hole in the
storage bin.
Front Panel
Louver
Fig. 48
Screws
Screws
Condenser