
Installation Guide


©2016 Hestan Commercial Corporation
3
EN
INSULATED JACKET INSTALLATION
(continued)
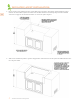
3. Remove all loose items inside the grill (grates, warming racks, radiant trays, rotisserie rod, etc.) Remove
the drip pan and control knobs from the grill.
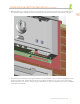
4. Two persons are required to lift the grill head into the jacket, as it is very heavy. Before lifting, be sure
any wires are tucked out of the way and taped to the grill firebox so they don’t dangle and get caught
on anything as you lower the grill into the jacket. Slide the grill in and leave a few inches in the back
open to route the electrical harness and gas connections to the area underneath the Insulation Jacket and
island. This would be a good time to perform electrical tests, etc. before pushing the grill fully into the
jacket and proceeding to the next step.
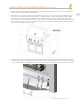
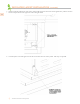
4. Remove the screws securing the control panel to the front of the grill. Carefully tilt down the control
panel being careful not to damage the wires to the switches and LED light bar. Pull off the connectors to
the 2 switches and the LED light bar at this time. Remove the control panel from the grill and set aside.