
Product Manual

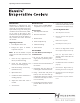


WATER PUMP
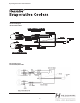
Turn o the power to the unit.
Remove shipping lock on pump
body.
Remove the bottom base plate to
clean pump cavity when clogged.
Clean pump lter when clogged by
using soft bristle brush to remove
accumulated dust and scaling.
1.
2.
3.
4.
NOTE: Never remove the screen, as
removal may cause contaminants to
obstruct pump.
Re-install base plate by following
sequence numbers on the bottom
of the plate.
Remove water pump from cooler
during the winter and store in a dry
place.
5.
6.
CHANGING THE FILTER/ WET
MEDIA (ASPEN / RIGID MEDIA)
Using pliers, unbend the points of
the supports and remove them
from the wall.
1.
Remove the dirty lters.
Clean the wall body and the upper
channel. Use water and a soft
bristle brush only.
Place the new lters into the walls.
Make sure that the lters are well
moistened before putting them
into place.
Place the supports into their
original position once maintenan-
ce has been performed.
2.
3.
4.
5.
NOTE: Never operate the unit without
these parts in place. Doing this could
generate an overload and damage the
motor.
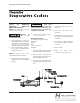
BELT ADJUSTMENT
The adjustable belt and pulleys are
factory set. Any alteration to the air
ow system should be done by an
authorized technician. Before any
adjustment is made, unplug the
cooling system.
The appropiate belt tension and
alignment is an important factor for
the ecient operation of the unit. Do
not adjust the belt tension by chan-
ging the pulleys diameter. Adjust the
brackets that hold the motor to the
motor base only. Due to wear and
use, the belt tends to loosen, therefo-
re, chech for proper tension during
maintenance.
To adjust the belt tension, loosen
the screws on the motor brackets
(use a 7/16 inch or an adjustable
wrench). Once loosened the motor
can then be repositioned to apply
more tension to the belt. Belt
tension should be adjusted to allow
for 1.2 cm (1/2”) to 2 cm (3/4”) of
exing on each side of pulley. Once
the required belt tension is reached,
retighten set screws on the bracket.
Align the belt in vertical position,
and check the amperage of the
motor.
Operating Instructions & Parts Manual
R
6