
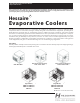
Product Manual


Maintenance is important for your
cooler to have an eective and long
service life. To avoid unnecessary part
replacements, keep your unit in good
condition. Do not add cleaners, additi-
ves or scents to the water, it may
reduce the life of your equipement. Do
not change the size of the pulleys, it
may overload the motor and “burn
out” the unit.
Maintenance
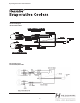
Beginning of Season
Turn o power to the unit.
Change the aspen or Celdek®
evaportive cool pad.
1.
2.
NOTE: Be sure the Celdek® cool pad
arrows are in the same direction as the
air ow.
Clean the tray, equipment and
lters. (See Unit Cleaning)
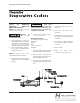
Check the belt condition and
tension. (See drawing page 7)
Lubricate bearings, as necessary.
(Lithium base oil)
Open water valve.
Conrm the water distribution is
working properly.
Adjust the water oat valve if
needed.
Start the unit.
3.
4.
5.
6.
7.
8.
9
Middle of Season
Change aspen or RIGID MEDIA
evaporative cool pad if neces-
1.
End of Season
Turn o power to the unit.
Close the water valve.
Remove V-belt.
Drain and dry the tray.
Lubricate bearings.
Cover the unit.
1.
2.
3.
4.
5.
6.
Be sure to turn o the power
supply before performing main-
tenance.
Remove the side and back walls of
the cabinet.
Completely drain the cabinet by
removing the drain from the base.
Using a brush with soft plastic
bristles, clean the water tank by
removing the dust and accumula-
ted mineral salts (only use water
to clean the tank).
Put the drain back into its original
position. Make sure there are no
leaks.
1.
2
3
4
5
If you are not going to use your
unit for more than 30 days, turn o
the main water and power supply.
6.
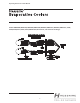
UNIT CLEANING
For units: Window, Ducted Aspen
and Mobile Units.
For units: Rigid Media Units
Turn o power to the unit.
1.
Remove the bolts and open the
cover 180ª
2.
Remove the rear plate.
3.
Carefully remove the pieces.
4.
Remove the Rigid Media toward
the rear plate and put aside to dry.
5.
Clean the Rigid Media
with a
smooth, plastic brush after the
pad is dry.
6.
Clean the bottom tray.
7.
Conrm the oat valve is installed
properly.
8.
9.
Re-install the RIgid Media by
following the arrows on the pad.
10.
Re-install the pieces into the Rigid
Media
pad.
Re-install the rear plate and the
cover.
11.
Operating Instructions & Parts Manual
R
5