
Manual


4
Installation Instructions
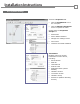
The default factory settings will be used in almost every application. They are:
Group 1
Terminator OFF
NOTE: In some situations (such as mantraps) the default factory settings must be chaged. Refer to the
Hi-O Systems Manual (A8002) for additional information. If so, follow the procedure below to change
the DIP switch settings before installing strike
IMPORTANT: Ensure that the serial number of the unit is retained. Once the device is locked and
encryption enabled, access to the device requires the serial number. If the serial number is lost, the device
must be returned to the factory to be reset.
A.
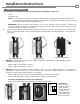
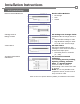
B. SWITCH 1: Set the manual group switch. Default is OFF and is appropriate for most applications. Most
installations use Group 1 only.
Switch 1 OFF = membership in Group 1.
Switch 1 ON = membership in Group 2.
C. SWITCH 2: Set the termination resistor (Default is OFF). In a Hi-O CANbus network, it is necessary to
terminate the communication bus to avoid interference. Termination should take place in Activators, for
example in a card reader, opening button, or a gateway.
Switch 2 OFF removes the 120 ohm connection between CAN-Low and CAN-High.
Switch 2 ON terminates a 120 ohm resistor between CAN-Low and CAN-High.
Use only one termination resistor per application.
Refer to the Hi-O Systems Manual (A8002) for additional information.
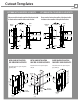
Adjustment Instructions
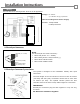
Orientation:
When you hold
the strike with the
switch oriented
towards the top of
the device, the
switch position ON
is at towards the
TOP of the device.
ON
1 2
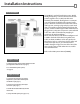
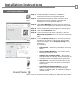
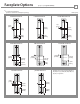
To change the settings carefully peel off the white label located on the floor of the HT1006 to access the DIP
switch. Set the label aside. Using a small tool adjust the DIP switches as described below. Then replace the
white label.
Unit with protective label.
DIP switch location.
Serial number placement.