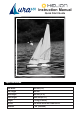
Instruction Manual Quick Start Guide Specifications Hull Width 135 mm (5.3”) Hull Length 650 mm (25.6”) Mast Height 950 mm (37.4”) Total Height 1365 mm (53.75”) Weight 1.35 kg (47.62 oz.
Introduction Whether you’re an experienced RC skipper or new to the hobby, the Helion Aura 650 is the sailboat for you. The Aura 650’s hull is made from durable blow-molded ABS for added strength and has an attractive pre-applied trim on both the hull and sail that lets it stand out on the water like a full-size sailboat. It also comes pre-assembled and partially pre-rigged to help make it easy to get on the water.
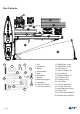
Box Contents 4 2 1 4 3 5 7 6 4 4 8 9 10 11 12 15 14 16 19 18 17 20 13 25 21 24 26 22 1. Hull 2. Transmitter 3. Ballast 4. Display Base 5. Keel 6. Short Mast 7. Rudder 8. Backstay Rigging 9. Long Mast 10. Jib Sail w/Boom 11. Main Sail w/Boom 23 . 3 / 14 12. HM5x25mm Screw 13. HM5x50mm Screw 14. Luff Rings (3) 15. PWA 2x10x8mm (2) 16. Clip (Rudder) 17. Rubber Gaskets (2) 18. Dyneema Cord 19. Forestay Fitting 20. Cord Holder 21. H2.0mm Allen Key 22. H4.0mm Allen Key 23.
Installation and Rigging Guide = 1. Setup the display base as shown in picture. Insert the tubes into the sockets, no gluing is required. 2. Setup the keel, water-proof rubber piece and ballast by HM 5x25mm screw, using a H 4.0mm allen key. 3. Setup the keel, water-proof rubber piece into hull by HM 5x50mm screw, using a H 4.0mm allen key. 4. Insert the rudder from hull bottom to deck through a rudder arm, connected with a clip, make sure rudder is able to rotate freely.
7. Insert long mast through main boom and into the hull. Ensure the mast screw engages the main boom slot. 8. Connect long mast, forestay fitting part and short mast together. 9. Raise the sail and place the plastic swivel on top of the short mast. Insert the metal backstay crane through the swivel and into the mast. 10. Assembly should look like drawing above, please note that the sail does not need to be connected to the rear mounts of the swivel.
11. Locate the approx. 40” long length of rigging. Attach the clevis to the metal backstay crane and the other end to the rear eyelet on the hull. The end with the adjustment bowsie should be closer to the hull. 13. Unroll the jib sail and untape the clevis from the top of the sail. Hook the clevis to the forestay fitting keeping the eyelet pointing toward the bow of the boat. SR5 12. Unroll the jib sail and untape the clevis from the top of the sail. 14.
17. Now that you have completed the basic assembly of your sailboat, some adjustment of the rigging may be necessary. Please refer to the instructions below. (1) Silicone ring 1 on the main boom can be adjusted to tighten the main sail. Leave a little slack in the sail so that it can catch the wind. Generally, in strong wind conditions the sail needs more slack and in gentle conditions it can be tighter. (2) Silicone ring 2 is used to adjust the line length to keep the main boom in center position.
19. The counterweight on the front of the jib boom is to adjust its balance. It should balance with the CG (center of gravity) on SR7. Move the counterweight either in or out to make the boom feel neutrally balanced and moves to either side equally easily. 20. Move bowsie on front jib sail rigging to maintain a slight bend in the mast. The dotted line in the drawing to the right is an exaggerated example of the concept the bow that you will create will be less pronounced than the drawing shows. 21.
24. Move bowsie attached to the main sail grommet to tighten or loosen the main sail sheet. 25. Move bowsie on main sail backstay rigging to maintain a slight bend in the mast. The dotted line in the drawing to the left is an exaggerated example of the concept the bow that you will create will be less pronounced than the drawing shows. Loosen this screw 26. Loosen the screw on the arm of the main boom to adjust the height of main boom. This adjustment is rarely needed.
Transmitter Functions The yacht comes with a 2.4GHz 4-channels radio system. For sailing you will only need 2 channels. 1. The sail stick controls the angle of the main and jib sails in relation to the hull. When you move the sail stick up, both sails will be allowed to expand forward to catch the wind. Both sails can expand to the left or right depending on the direction of the wind. 2. The rudder stick controls the direction of the rudder, left or right. 3.
How-to-sail Instruction Sailing presents a more interesting set of challenges than power boating, it requires a constant reaction to water movement and wind conditions. These reactions require adjustments of both rudder and sails in order to find the best possible setting for speed and course. There is not substitute for actual “on-the-water” experience. After a couple of outings you may want to read thorugh the manual again as you get a better understanding of the art of sailing.
Sailing Checklist NOTE: This checklist is NOT intended to replace the content included in this instuction manual. Although it can be used as a quick start buide, we strongly suggest reading through this manual completely before proceeding. 1. Always turn transmitter on first. 2. Check that the sails, fittings and rigging are properly installed and adjusted. 3. Sail the boat in an appropriate body of water. 4. Switch the dual rates to 100% 5. After sailing, turn receiver power off. 6.
Aura Spare Parts Firelands Item Description Item Number HLNB0100 HLNB0101 HLNB0102 HLNB0103 HLNB0104 HLNB0105 HLNB0106 HLNB0107 HLNB0108 HLNB0109 HLNB0110 HLNB0111 HLNB0112 HLNB0113 HLNB0114 HLNB0115 HLNB0116 HLNB0117 HLNB0118 HLNB0119 HLNB0120 HLNB0121 HLNB0122 HLNB0123 HLNB0124 HLNB0125 HLNB0126 13 / 14 Aura 650 RTR sailboat Painted Hull - White: Aura 650 Hatch Set: Aura 650 Pre-Printed Full Sail: Aura 650 Jib Spare Parts Set: Aura 650 Main Sail Parts Set: Aura 650 Electronic Mount Sets: Aura 650 Dyneem
© 2015 Helion Rev. 1.