™ INSTRUCTION MANUAL Specifications Length: Width: Height: Rotor Span: 9.0 in [229mm] 2.7 in [68mm] 3.3 in [84mm] 7.9 in [200mm] Flying Weight: 2 oz [57.
IMPORTANT PRECAUTIONS ● Only use the included charger with the included battery or replacement part (GPMP0409). ● Do not attempt to use this charger with NiCd or NiMH battery packs. ● Never charge in excess of 4.20V per cell. ● If the battery should become damaged, discard the battery. Do not attempt to use a damaged battery. ● Do not leave the charger unattended while charging.
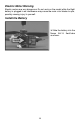
WARRANTY Heli-Max™ guarantees this kit to be free from defects in both material and workmanship at the date of purchase. This warranty does not cover any component parts damaged by use or modification. In no case shall Heli-Max’s liability exceed the original cost of the purchased kit. Further, Heli-Max reserves the right to change or modify this warranty without notice.
TABLE OF CONTENTS IMPORTANT PRECAUTIONS . . . . . . . . . . . . . . . . . . . . . . . . . . . . . . . . . . . . 2 WARRANTY. . . . . . . . . . . . . . . . . . . . . . . . . . . . . . . . . . . . . . . . . . . . . . . . . . 3 INTRODUCTION . . . . . . . . . . . . . . . . . . . . . . . . . . . . . . . . . . . . . . . . . . . . . . 4 SAFETY PRECAUTIONS . . . . . . . . . . . . . . . . . . . . . . . . . . . . . . . . . . . . . . . 5 ADDITIONAL ITEMS REQUIRED . . . . . . . . . . . . . . . . . . . . . . . . . . . .
SAFETY PRECAUTIONS Failure to follow these safety precautions may result in severe injury to yourself and others. Keep your face and body as well as all spectators away from the plane of rotation of the rotors whenever the battery is connected. Keep these items away from the rotors: loose clothing, shirt sleeves, ties, scarfs, long hair or loose objects such as pencils or screwdrivers that may fall out of shirt or jacket pockets into the rotors.
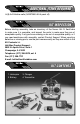
ADDITIONAL ITEMS REQUIRED ❏ (8) AA Alkaline cells (SANP3500 AA 4-pack x2) KIT INSPECTION Before starting assembly, take an inventory of the Novus AH-1J SeaCobra to make sure it is complete, and inspect the parts to make sure they are of acceptable quality. If any parts are missing or are not of acceptable quality, or if you need assistance with assembly, contact Product Support. When reporting defective or missing parts, use the part names exactly as they are written in the Kit Contents list.
INSTALL THE TRANSMITTER BATTERIES ❏ Remove the battery cover from the back of the transmitter, remove the battery box and install eight (8) “AA” batteries into the battery box. Doublecheck the polarity of each battery before placing the battery box back into the transmitter and replacing the battery cover. ❏ Turn on the transmitter using the power switch as shown above and verify that the indicator illuminates. Turn the transmitter off for now.
GET THE MODEL READY TO FLY Charging the Flight Battery WARNING!! The charger supplied with the Heli-Max Novus Helicopter contains protective circuitry. If you experience any difficulties while charging the battery, please disconnect the battery from the charger and unplug the charger from the power source. Allow the battery and charger to rest for two hours as this will allow the charge protection circuit to reset.
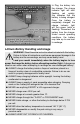
❏ Plug the battery into the charger. The charge indicator light will start flashing red quickly; this indicates that the battery is being charged. Once the battery is completely charged, the charge indicator light will turn green (solid or flashing). Disconnect the battery from the charger. Under normal operating conditions, the battery may take up to one hour to recharge. Lithium Battery Handling and Usage WARNING!! Read the entire instruction sheet included with this battery.
Electric Motor Warning Electric motors are very dangerous. Do not work on the model while the flight battery is plugged in as interference may cause the main rotor blades to spin, possibly causing injury to yourself. Install the Battery ❏ Slide the battery into the Novus AH-1J SeaCobra as shown.
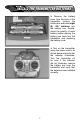
TURNING THE MODEL ON ❏ The Novus Helicopter uses a 2.4GHz system that requires a binding process when the unit is powered up. This process involves connecting the flight battery to the ESC with the transmitter turned off. Ensure that the throttle stick is at its lowest position and turn the transmitter on. You will notice that the transmitter logo begins to flash, indicating that the binding process is taking place.
TRANSMITTER CONTROLS All controls described as follows are with the tail pointing directly towards you. This is the best way to start out since it keeps the control inputs oriented the same. Once you start getting comfortable you can work on side hovering and nose-in. Moving the cyclic stick right will cause the helicopter to tilt right and it will start moving that direction. Moving the cyclic stick left will cause the helicopter to tilt left and start moving in that direction.
Moving the cyclic stick backwards (towards you) will cause the helicopter to tilt backwards and start moving that direction. Moving the cyclic stick forward (away from you) will cause the helicopter to tilt forward and start moving that direction. Moving the collective stick up (away from you) will cause the helicopter to climb higher.
Moving the collective stick down (towards you) will cause the helicopter to descend. Moving the tail rotor stick towards the left will cause the helicopter nose to rotate left (counterclockwise). Moving the tail rotor stick towards the right will cause the helicopter nose to rotate right (clockwise).
FLYING The Heli-Max Novus AH-1J SeaCobra is an extremely lightweight helicopter. Taking that into consideration, you should only fly the helicopter indoors or in calm winds less than 1mph. Until you become accustomed to the Novus AH-1J SeaCobra helicopter we highly recommend flying it in a large area of at least 35 feet [10.5m] square with no obstacles. The Novus AH-1J SeaCobra is extremely lightweight and does not fly well in ground effect (air disturbance when the model is hovered below 1 foot [30cm]).
Slow Pirouettes – Add a small amount of tail rotor (left or right) and try rotating the helicopter slightly sideways and see if you can hold it there. If you feel uncomfortable, then bring the tail back toward you. Once you start getting comfortable, try moving the helicopter to the side. Then turn back and fly back to the other side in straight lines. Once you get that down you can try rotating the helicopter around 360°, which is called a pirouette.
MAIN ROTOR GRIP REPLACEMENT ❏ Remove both blade bolts and main rotor blades. Remove the flybar linkage from the blade grips. Remove the two blade grip screws and the blade grips can be easily removed. Reinstall the parts in the reverse order listed above. REPLACING THE FLYBAR ❏ Loosen the screws on both flybar paddle collars. Rotate the paddles counter clockwise to remove the paddle and the collar from the flybar. Loosen the screws on the flybar carrier (both sides).
REPLACING THE TAIL SHAFT AND TAIL ROTOR ❏ Use a flat blade screw driver to carefully pry the tail rotor from the tail rotor shaft. Slide the tail drive gear off of the shaft. Slide the tail rotor shaft out the opposite side of the tail rotor case. Slide the new tail rotor shaft into the tail rotor housing. Slide the tail drive gear onto the shaft (the step faces inward) and press the tail rotor onto the shaft, ensuring that the two protrusions on the tail rotor line up properly with the tail drive gear.
Notes: 19
ORDERING REPLACEMENT PARTS Replacement parts for the Heli-Max Novus AH-1J SeaCobra are available using the order numbers in the Replacement Parts List below. The fastest, most economical service can be provided by your hobby dealer.
EXPLODED VIEW 2 1 5 16 6 5 6 4 9 5 6 6 16 1 9 9 16 11 9 7 4 16 2 15 3 8 6 13 23 13 14 23 24 25 18 25 16 13 16 13 14 13 16 14 14 6 9 10 15 21 17 15 16 12 16 20 12 19 17 21 14
Other fine products Heli-Max Kinetic™ 50 ARF HMXE0250 Heli-Max Novus CX HMXE0803 Heli-Max Axe™ CX Micro Coaxial RTF HMXE09✱✱ 22
available from Heli-Max Novus CP HMXE0804 Heli-Max Axe 400 3D RTF HMXE0800 Heli-Max Axe 400 3D RxR HMXE0801 23
Entire Contents © Copyright 2009 HMXE0805MNL01